Busti
-
Posts
209 -
Joined
-
Last visited
Content Type
Profiles
Forums
Events
Reborn Development Blog
Rejuvenation Development Blog
Desolation Dev Blog
Everything posted by Busti
-
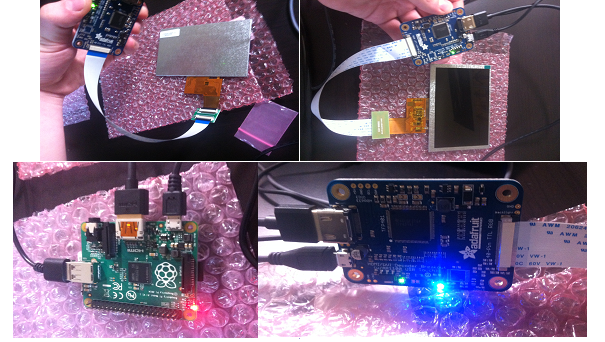
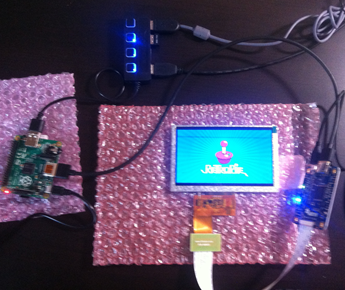
Here is my second update: Software configuration and initial set-up! I have not yet done the finishing on my 3D printed parts, but I did go ahead with all the software related stuff. Download: http://blog.petrockblock.com/retropie/retropie-downloads/ Instructions: https://github.com/RetroPie/RetroPie-Setup/wiki/First-Installation OR http://emulationstation.org/gettingstarted.html To install the necessary software on the Pi, I need a microSD card. The SD card was not recognized, though I have a port for it; I had to reinstall the driver for it. Worked immediately. Yet the next day, Windows made over 15,000 registry edits as part of an update, which is probably why I couldn’t read the SD card anymore the next day. I bought an SD card reader, which is very convenient. After being repeatedly warned of buying SD cards online (lots of fake products!), I decided to verify the SD card using h2test2.exe, which writes data to the SD card, then reads it back as verification. Any unexplained losses in capacity/ writing speeds, or defective regions are to be identified. The real product has no issues passing this test. H2testw was downloaded from (http://www.softpedia.com/get/System/System-Miscellaneous/H2testw.shtml). Results are good. Warning: Only 14751 of 14752 MByte tested. Test finished without errors. You can now delete the test files *.h2w or verify them again. Writing speed: 7.48 MByte/s Reading speed: 14.0 MByte/s The retropie was downloaded as a .gz file (Version 3.2.1), which is compressed. WinRAR was used to unzip the .img file, used for installation. Next, the software Win32 Disk Imager was downloaded to burn the image to the SD card (http://sourceforge.net/projects/win32diskimager/). The instructions include the following note, which is entirely true and correct: In Windows, the SD card will appear only to have a fairly small size once written - about 55 to 75 MB. This is because most of the card has a partition that is formatted for the Linux operating system that the Raspberry Pi uses which is not visible in Windows. If you don't see this small directory with files such as kernel.img then the copy may not have worked correctly. The last part of the SD setup was a minor edit to the config.txt file, which formats the operating system to match the resolution of our display. The file is found in ~/boot/config.txt. Setup of the Pi In this step, the software configuration is completed while operating the Raspberry Pi. As such, all the basic components for this setup must be connected and tested. An effort was made to make the workspace dust-free (using alcohol wipes) and to lower the chance of an ESD (electrostatic discharge), by working on a hard flat surface. The basic setup is shown as: After hooking up all the connections, the Pi booted up succesfully, started EmulationStation, after which I played Doom for 5 minutes. Success! Next, the software was to be configured for use within the SGP. Here comes the Linux programming. First, we set up the Wifi module for internet. This is done by editing the WPA_supplicant. WPA stands for Wi-Fi protected access. With the command ifconfig, we can determine the IP address of the Pi and other things. As a note, the Pi did not recognize my keyboard keys as I see them. Notably, the “ was switched with the @. This nuisance may stem from a language setting I am not aware of? With the IP address of the Pi known, it is now possible to configure the Pi with remote access. The program “Putty” is used to create an SSH (Secure Shell) connection with the Linux-driven machine. The login is standard: pi, raspberry. Now we have complete control of the Pi, so we can do anything from our laptop. First, we install Adafruit Retrogame. It is not very big, and seems to mostly be an edit to have retropie work with some Adafruit projects, including the Cupcade and PiGrrl. By editing the retrogame.c code, we can specify the inputs for out SGP! We denote specific button values to a specific GPIO # connection of the Pi. The next step is to make it so that this file is run every time we start the SGP. The rc.local (run-control for local objects) will specify which programs to start after startup is complete. Here, we add the command to run retrogame. The last step, (10-retrogrames.rules), appears to specify some input controls. This is beyond my current understanding, but is described as: “Note that by default retrogame won't work with SDL2 applications that depend on evdev for input events. Specifically this means applications like the latest version of RetroPie and EmulationStation won't be able to see key events generated by retrogame. However you can fix this issue by adding a small custom udev rule to make retrogame keyboard events visible to SDL2.” So, what about the time feature? If I want to play Pokemon, I would love to use time. The Pi gets his time information from the internet connection, so all I need to do is change the timezone to US/Central time. I do not know if this will work, because this is not a hardware clock. I will find out after I finish the project... $ date $ sudo ln –sf /usr/share/zoneinfo/US/Central /etc/localtime So far my progress on this project. I mapped all teh SGP keys for the software, and cannot do any more software configuration until I install the actual hardware. Next step: finishing the 3D printed parts. I would add more pictures, but I cannot. I am exceeding the memory limit for my account. Would somebody please advice on a good alternative way to show pictures on this thread?


-
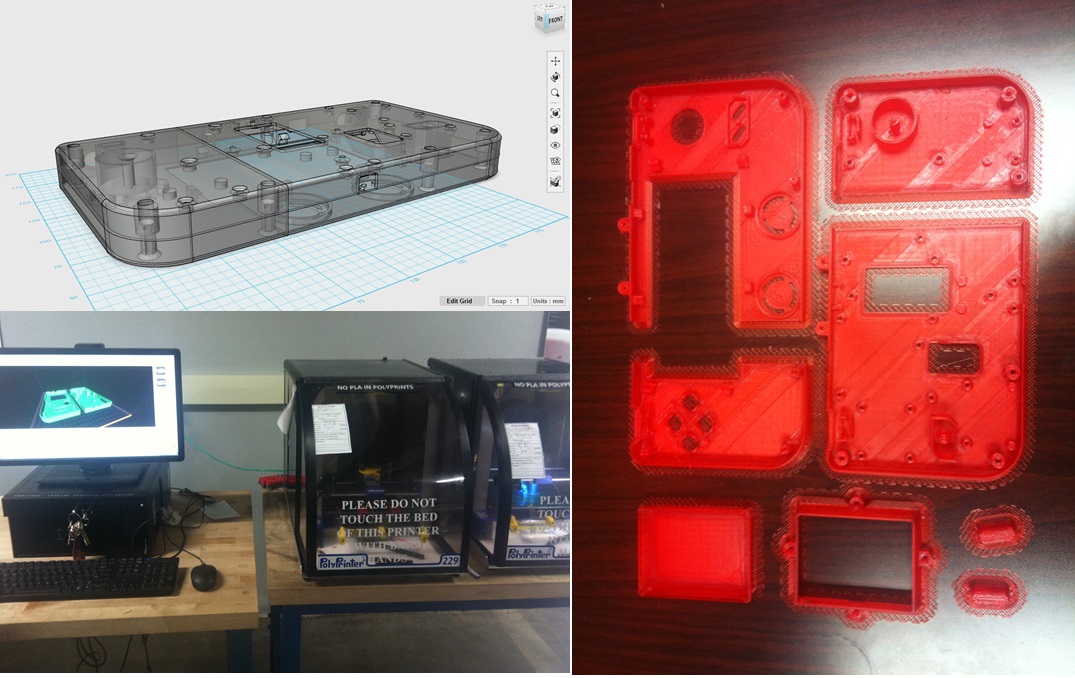
Hey people, I want to share with you a project that I am enthusiastically working on: The Super Game Pi (SGP), designed by Adafruit Industries. I initially wanted to make the PiGrrl console, but then I found this one. The project is described as (https://www.youmagine.com/designs/super-game-pi ) I got very enthusiastic of course! Here is why I am making it: I wish to make a handheld gaming console, to play games. I wish to save money in the long run, by being able to play games I normally cannot, without paying market value for them, without spending hours on ebay or amazon to hunt for good deals, etc. I wish to learn about electronics. How to work with them. How to hook them up. How are these components designed? What design choices are important? Etc. I wish to learn about 3D printing. This is an upcoming technology. All aboard the 3D printing hype train! I wish to get more experience in Linux. The raspberry Pi works on Linux, so it requires some programming expertise. I am making a log for future reference, as this is a form of knowledge retention, but will serve as an excellent source of knowledge/inspiration for new designs. Bragging rights It is going to be FUN So I ordered all the components I need from Adafruit, Amazon, Ace hardware store,and I started 3D printing. I am very much in the early stages, but if you like to see more, I will keep this thread up-to-date! In this picture you find the 3D model as I edited in Autodesk 123D Design. Next to that, the printing set-up at my university. Lastly, you see the raw printed parts. I still need to give those some finishing. Please share your thoughts on the project. This is my first project working with electronics, so I will be taking it slow. Would someone in the comments please tell me how to show pictures (not through this website, I have a file size limit), and how to show youtube videos? That would help.

-
I have finally decided on my new project! Wouldn't it be SOOOOO awesome to play Reborn on a Super Game Pi console?
-
Just received pokemon Ruby from Ebay - And it appears to be a fake. I'm so sad right meow

-
-
NEW SPECULATION: The final boss for Pokemon Reborn is a pulse-Mewtwo, that mega-evolves!
-
That looks so much better! I love it.
-
Very nice Ame. I like the ball of light. Why does it flash the original pokemon though between the ball and the mega/pulse-evolution? It just seems to me it would look a little better if it went straight from the ball - mega evolution.
-
Nothing like watching a little anime when home alone! I enjoy Fairy Tail very much
-
ralts
-
I translated the term "Zorgzame overheid" very literally. It is a form of statism, in which the government has a steering function for the development of society. I chose caring, because steering as such is often meant to fight inequality and even to steer consumer spenditure (think of extra tax on tobacco and gas), leading to what is conceived as a more desirable standard of living. The government also provides a plethora of services and goods that are deemed inappropriate for companies to do. Think clean water, and the like. Whereas you may question the associated efficiency loss and legal burdens, it does ensure quality, availability, and jobs.
-
You all have great point, but I do not see anybody making a reference to the European countries, where people can still get very rich, but there are only very few people under the poverty line. It is a capitalist market, but the government has a caring role! I think the role of the government is the most important part of the "capitalist" market. Now what they do is tax people progressively. As such the higher incomes are taxed more heavily, which provides enough money to the government to take care of social aspects of society: education, healthcare, retirements, subsidies to arts and culture, and maintaining the standard of living to those that are unemployed. The result is not that the entire market is a void, not at all. And the EU certainly does have legislation in place to prevent all job from going to Asia. One way is to apply import/export taxes. That, though, is a debate all on its own. Now I have argued quite repeatedly about whether it is possible to have such a social aspect to the States. As a Dutch person, I am very well aware that living in the Netherlands is much nicer, even though a lot less money is going around. Yet here I recognize your arguments coming into play: This country is gigantic! What a massive change that would be. The rich companies will not allow any elected officials to start taxing them. The poor do not help either. The subsidies for the unemployed and health care benefits will not be seen as a chance to build a life, but rather to drain the system. This is what I've learned from Obamacare, which is significantly increasing health care coverage, but greatly increased the strain on the --> MIDDLE CLASS <--. Anyway, my point being that a caring government can work well in a capitalist market, but it requires the right mindset, acceptance and off course a constructive society to work. I just do not see how the USA could pull this off, even if 90% of the people wants it to be so.
-
First of all, happy birthday! You are an awesome person. I highly respect the way you are holding up, and express yourself and your superior morals in such an inspiring fassion. I think you are teaching a valuable lesson here and I am grateful for that. Now, you seem well aware that the US is not a very friendly place. Maybe you could entertain the thought of living in a country where most of the population is down-to-Earth? I actually do know a couple places in Europe that are quite friendly, no matter who you are. Perhaps, someday, the US will be a cool place for you as well.
-
Before saving Titania, I went to train my pokemon. That took a least a week
-
How about a -6 in attack and a +6 in defense on your favorite wall. Just stall the sucker until he struggles to death Though... it does take 15 minutes for the battle...
-
I would like to see my character change sprite for fishing!
-
We all know it actually stands for Frikking Evil Annoying Rodent!
-
Wonderful idea! I like it! Just goes to show, EP16 will require a new playthrough. Especially since Ame mentioned the ellipses, cannot unsee!! I hadn't noticed them before.
-

You can read the labels on the PULSEs now. EPIC SPECULATION TIME!
Busti replied to CURIE's topic in Reborn City
I'm wondering how new players are going to put this together, without using the forums? Without any mention of the missing pulse nrs, new players wouldn't be able to puzzle this together. Would the game be more proper, without involving the need to look this up? -
I really liked my exploud, but his "powerhouse" feature just wouldn't power through anything anymore....
-
Most tedious battle ever. Solaris Garchomp defeated by 6 attack drops, 6 defense boosts, pp stall, struggle, full restores, and FINALLY victory. First time I could beat him

-
How about some giant whirlpools
-
I just realized that if Ame is going to turn the water blue, Apophyll beach and Azurine Island also need to be reworked... The whole job seems to be a lot larger that way!
-
Gen 6 Pokemon Games Think all my Pokemon are Hacked
Busti replied to Lord Regal's topic in Pokémon Fan Club
If you have a problem with them, you should challenge them to a pokemon battle!