crikson
-
Posts
26 -
Joined
-
Last visited
-
Days Won
1
-
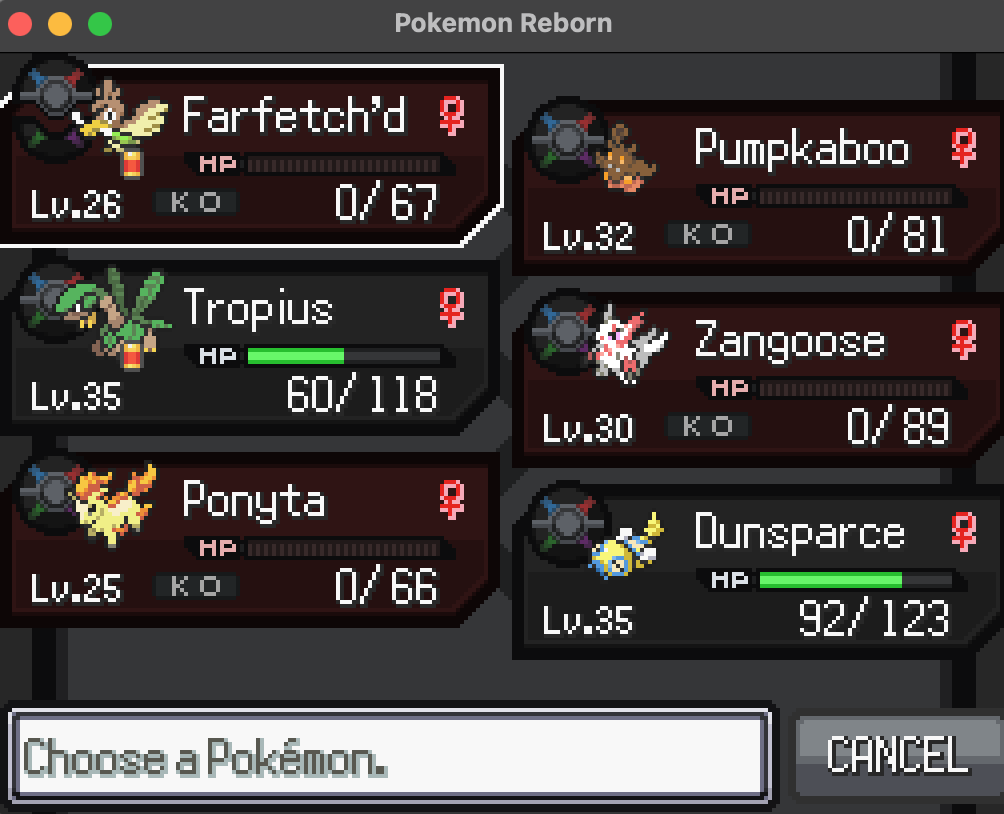
The Cocoon Badge After witnessing Corey's demise, I move on to toward the explosion at the Grand Stairway. The police is blocking the path so I head toward the Lapis Ward. Doing the Aqua Gang side quest I add Ponyta to the squad. Ponyta Lv.25 Flame Body Flame Charge Stomp Fire Spin Hypnosis After meeting Shelly and Cal, it's time to enter the Stairway with the help from Cain. Inside I add a new and very important member of the roster. Dunsparce Lv.35 Rattled Take Down Dig Coil Roost Dunsparce is very good at this point of the game; highest level possible below the cap, very good bulk and can boost and recover with Coil + Roost, making it able to pull off sweeps on his own. At the bottom of the cave I rescue Victoria after defeating Aster&Eclipse with her help. Outside the cave I get to battle Victoria and Fern in succession, tough battles but Dunsparce shows its strength by being able to set up Coils against the right mon and sweeping or KOing/damaging a lot of the opponent's Pokémon, with his team mates then finishing the job. Ponyta proves good versus Fern too, dealing good damage with Flame Charge, while increasing its speed to outrun and deal damage to Roserade. The battle with Cal seems tough but after I realize I can easily set up Dunsparce versus his lead Torkoal I just do that, and I run over his entire team with only the Sparce. After battling Cal, it's time for the third gym challenge versus Shelly, which fights in doubles format. At first I tried to go for a strategy of burning the field with Incinerate Slugma, with the help of a Fake Out turn 1 (I had caught a Meowth-Alola for that) but my Pokémon were getting KOed way too fast and I couldn't make too much progress. Then I tried to lead with Dunsparce and go for the Coil set up from the start, but the Intimidate from Masquerain, the general fast pace of the double battle plus my other Pokémon dropping too fast meant I couldn't get that done as well. So I decided to add a couple of new team members, increasing the levels of my team to get some more power and survivability which is needed on a double battle. Zangoose Lv.30 Immunity Slash Night Slash Crush Claw Revenge Pumpkaboo Lv.32 Frisk Bullet Seed Trick-or-Treat Leech Seed Destiny Bond I also got the Protect TM from the Nighclub, a generally useful move especially in doubles. For now I taught that to Ponyta. With the new additions I was able to conquer the third badge with the following team I led the battle with Farfetch'd and Pumpkaboo. Farfetch'd Defiant activates twice, becuase of Intimidate and Icy Wind from Masquerain. This allows me to KO Illumise with Slash at +3 Attack, while Pumpkaboo sets up Leech Seed on Masquerain. Illumise had used Rain Dance and I wanted to KO it because it's very annoying with Prankster Confuse Ray. Anorith is sent out and with Rock Slide it KOes Farfetch'd, while I use Destiny Bond with Pumpkaboo. Masquerain isn't really doing much and I want it to stay alive because of leech Seed recovery, so I am mostly focusing on Shelly's other Pokémon. Turn 3 I send out Ponyta for Farfetch'd and I use Protect, Pumpkaboo dies to Rock Slide taking down Anorith, which is a threat in Rain with Swift Swim and Rock Slide. It's time now for Dunsparce as Shelly sends out Yanmega. Yanmega KOes Ponyta with Ancient Power, while Dunsparce can safely use Coil behind Spiky Shield, due to the Telluric Seed triggering the shield on the Forest Field. I send out Zangoose for Ponyta, getting one free turn to attack Yanmega behind Spiky Shield, while Dunsparce recovers with Roost and Leech Seed. The next turn Slash + Take Down KO Yanmega and Araquanid is sent out. One more Slash from Zangoose while Dunsparce Roosts once again, and Zangoose is taken out by Struggle Bug. I send out Tropius and it's time to get a double KO. Dunsparce has now a couple of speed boost due to Struggle Bug triggering Rattled and it KOes a low HP Masquerain with Take Down. Tropius uses Nature Power, which gets turned into Wood Hammer in the field, KOing Araquanid. It's now a 2v1 against Volbeat. I spam Leaf Tornado with Tropius trying to get some accuracy debuffs, while Dunsparce alternates between attacking and recovering. Volbeat tries to set up Tail Glow, but it gets overwhelmed by two attackers and gets taken down in a few turns, finally ending the battle. Third gym badge acquired after a very challenging battle from Shelly, I had to change the strategy and team a few times but at the end I completed the task


-
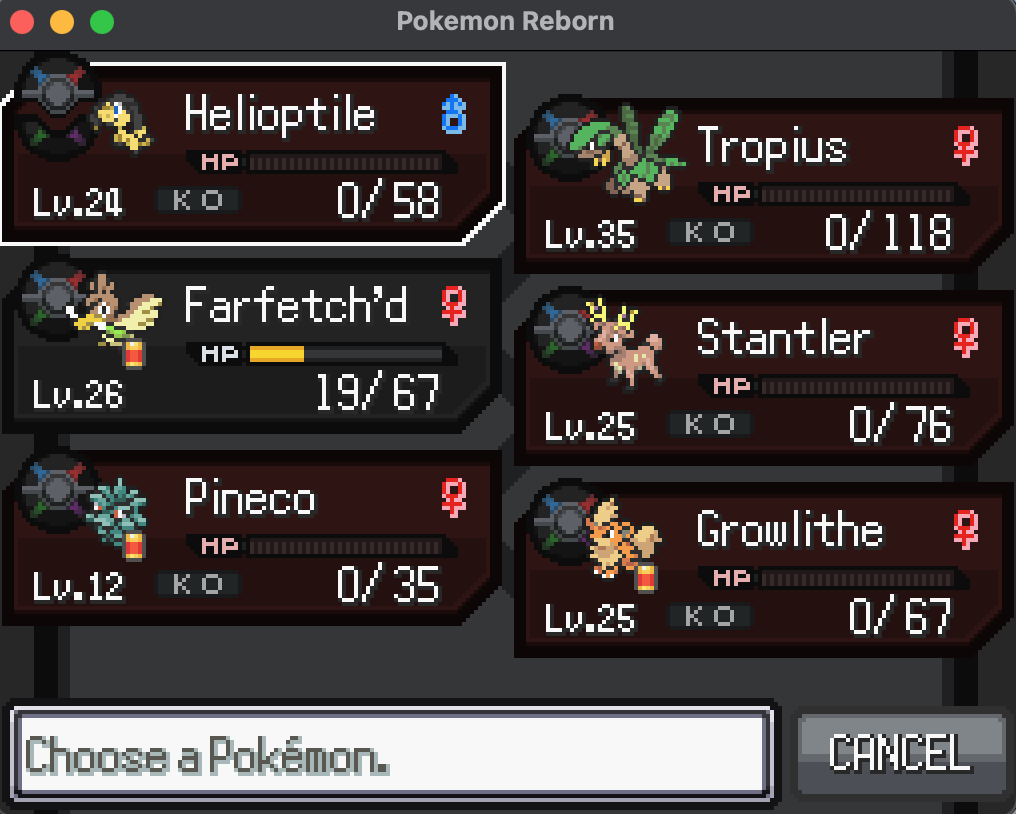
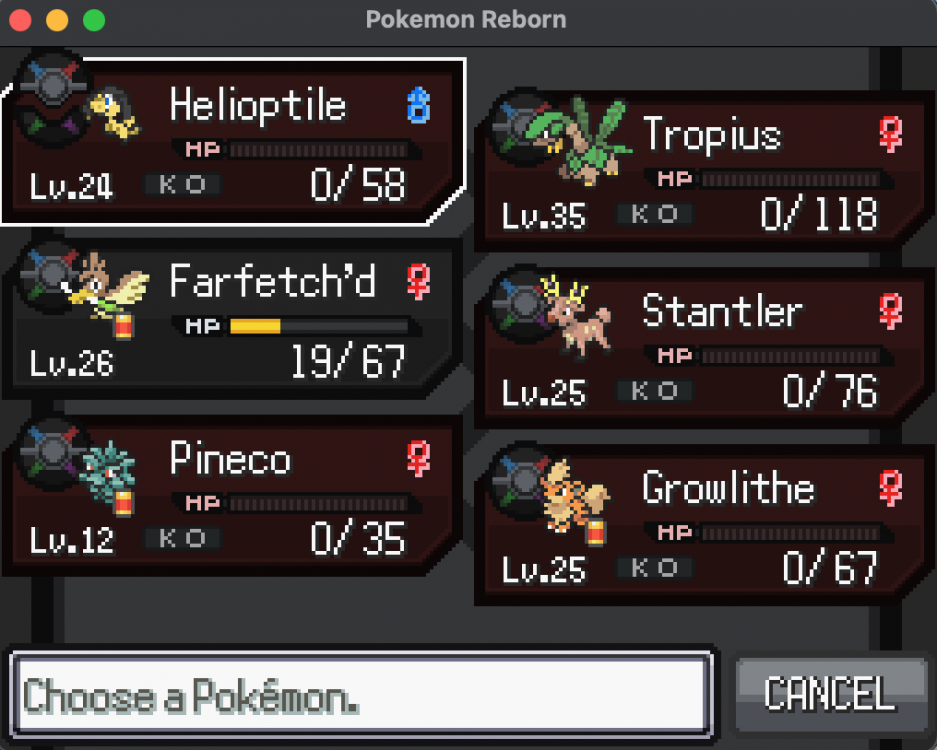
Poisonous Nightmare After defeating Florinia I made my way through Malchous Forest to encounter the second Pulse fight, this time against Taka. I hadn't added any new members to the team but with a mix of previously caught Pokémon I was able to defeat him fairly easily as he only uses two mons + the Pulse Tangrowth. After that I went to the Rhodochrine Jungle for the third Pulse fight. This fight is definitely harder than the previous one, as Ace uses 4 Pokémon and a very strong Pulse-Tangrowth with field boosted Growth, Stamina and Stored Power, and it can snow ball out of control very easily. Before this fight I added some new members to my roster: Snubbull Lv.21 Intimidate Close Combat Headbutt Bite Lick Kecleon Lv.23 Protean Ancient Power Psybeam Feint Attack Fury Swipes Stantler Lv.25 Intimidate Stomp Megahorn Disable Confuse Ray Tropius Lv.35 Harvest Natural Gift Leaf Tornado Whirlwind Leaf Blade Growlithe Lv.25 Intimidate Fire Fang Take Down Reversal Morning Sun Tropius is a very important Pokémon at this point since it's obtained at a very high level, 36 (I used a Common Candy on it to lower it below the level cap). For the Ace fight I used the following team After defeating Ace it's time to battle Corey. This fight is quite difficult due to his higher level pokémon, powerful synergy with the field and a Crobat which is very very hard to KO, while it hits you with very power attack that can boost further with Nasty Plot, outspeeding and OHKO everything. I attempted the battle quite a few times with my available Pokémon but couldn't get close to winning so I had to make some changes. To solve the Crobat problem I added a Pokémon that can take advantage of the Corrosive Mist Field mechanic of destroying the field and KO every active Pokémon by using Self-Destruct (among other moves that can achieve this). Here's the Crobat slayer. Pineco Lv.12 Sturdy Take Down Bug Bite Self-Destruct Protect I also added two more Pokémon for the battle. Helioptile Lv.24 Dry Skin Charge Beam (TM) Mud Slap Electric Terrain Razor Wind Farfetch'd Lv.26 Defiant Slash Knock Off Swords Dance Air Cutter I was using a Lv.23 Fearow instead of Farfetch'd but the lower level and less power meant I couldn't deal much damage against Corey's Pokémon. I was also lucky and caught a Farfetch'd holding the Stick item, giving Slash a 100% critical hit chance. The winning team used versus Corey is this Here's how the battle went. I led with Helioptile and used the combo of Electric Terrain, Mud Slap and Charge Beam. This makes it so that Venom Drench misses due to the different terrain on Turn 1, Focus Sash gets broken by Mud Slap and Skrelp misses (hopefully, if not reset) Acid on Turn 2, then it gets KOed by Charge Beam on Turn 3. Having a full HP Helioptile is needed so that Skuntank does not OHKO it and it can fire off a +1 Charge Beam for important chip damage. After Helioptile goes down I send out Stantler to KO the Skuntank with 2 Stomp, on the second one Aftermath KOs Stantler. After this I send out Growlithe while Corey sends out Mareanie. Hard switch into Tropius and damage it with Leaf Tornado for 80-90%, while Mareanie takes down Tropius with two Venoshock. Farfetch'd goes out to revenge KO. Crobat is next and it's time for Pineco to shine. I sacrifice Growlithe to allow a clean switch, then survive any attack with Sturdy and use Self-Destruct to change the field, but most importantly KO Crobat in one attack. Only Farfetch'd remains for Nidorina and Croagunk but it sweep them with Swords Dance and STAB Slash (or Knock Off if Slash gets disabled by Nidorina). Very difficult fight and at some point I was doubting it was even possible becuase of Crobat and the general difficulty of making progress versus his other Pokémon, but with the new additions and the Pineco strat I was able to defeat him in a few attempts. The Acid miss on Turn 2 is needed to KO Skuntank otherwise Helioptile dies to Pursuit and Stantler cannot KO Skuntank, which will then do too much damage to other mons and becomes difficult to KO, especially if Corey uses a Super Potion on it. A Lv.30 Toxic Boost Zangoose can be obtained at this point too, but I forgot to capture it at night time. It would for sure make the battle even easier since it can deal much more damage than Stantler/Growlithe while also being at a higher level. All in all quite a tough fight, but with the right team is very doable. Time to move on to the Lapis Ward.


-
Onyx Trainers School With access to the Obsidia Ward I added some new members to the roster, the most relevant being: Onix Lv.15 Sturdy Curse Rock Throw Rock Tomb Rage Klink Plus Thunder Shock Gear Grind Charge Vise Grip Noibat Lv.17 Frisk Wing Attack Bite Gust Absorb Pancham Lv.14 Scrappy Karate Chop Work Up Arm Thrust Leer A stronger Trubbish at level 17 was also caught in the Obsidia Slums. Pulse Tangrowth was defeated with Tail Whip spam by Blitzle and attacks, mainly Noibat Wing Attack and Klink Gear Grind. After freeing the Obsidia Park and reaching the Onyx Ward I added the following Pokémon: Spearow Lv.17 Sniper Aerial Ace Fury Attack Pursuit Leer Slugma Lv.20 Weak Armor Incinerate Clear Smog Rock Throw Harden Snover Lv.20 Soundproof Razor Leaf Icy Wind Grass Whistle Swagger Venonat Lv.20 Run Away Psybeam Poison Powder Confusion Supersonic Tranquill Lv.19 Super Luck Air Cutter Quick Attack Roost Leer Venonat and Tranquill can be caught at the Onyx building rooftop after defeating Fern. The team used to defeat Fern was this The team used for the Gym battle versus Florinia was this Here's the strategy used for the Florinia battle: Lead Trubbish and set 2 layers of Toxic Spikes, could only survive the 2 turns with Maractus missing one Nature Power (which turns into Sand Tomb, that has 85% accuracy, in the Desert Field). Use Spearow to damage Maractus, and after Spearow faints revenge KO Maractus with Tranquill. Florinia sends out Ferroseed which is handled by Slugma. Use Venonat, Tranquill and the poison damage for Cottonee, is important that Tranquill takes little damage because it needs to handle Breloom later. Cradiliy gets walled hard by Onix since it has no grass type attack and gets brought down by the poison damage. Switch between Venonat and Onix as Florinia switches around Cradily and Cacnea, and stall them until poison and attacks KO them. Breloom is the last Pokémon and due to Poison Heal and the Toxic Spikes it's quite diffcult to manage. High HP Tranquill with Chesto Berry should be able to absorb a Spore and land one Air Cutter, it then got put to sleep again with Breloom at low HP. Hope to wake up in max two turns to knock it out with an other Air Cutter, if sleep lasts too much Tranquill will go down to Mach Punch. Chesto Venonat walls Breloom decently well and can be used to damage it if it's sent out earlier when Cradily is getting stalled, but the damage from Venonat is very small and is recovered with Poison Heal, so Tranquill at the end is necessary to win. 2 Badges acquired, with this last battle being for sure the toughest one up until now.


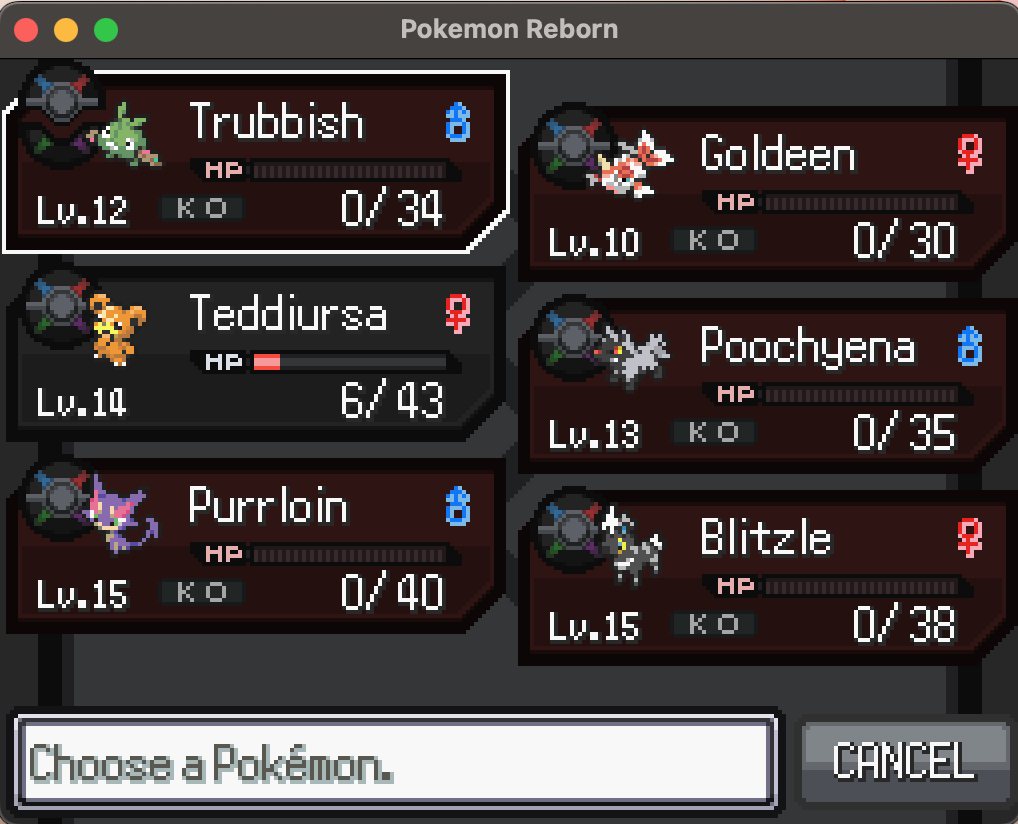
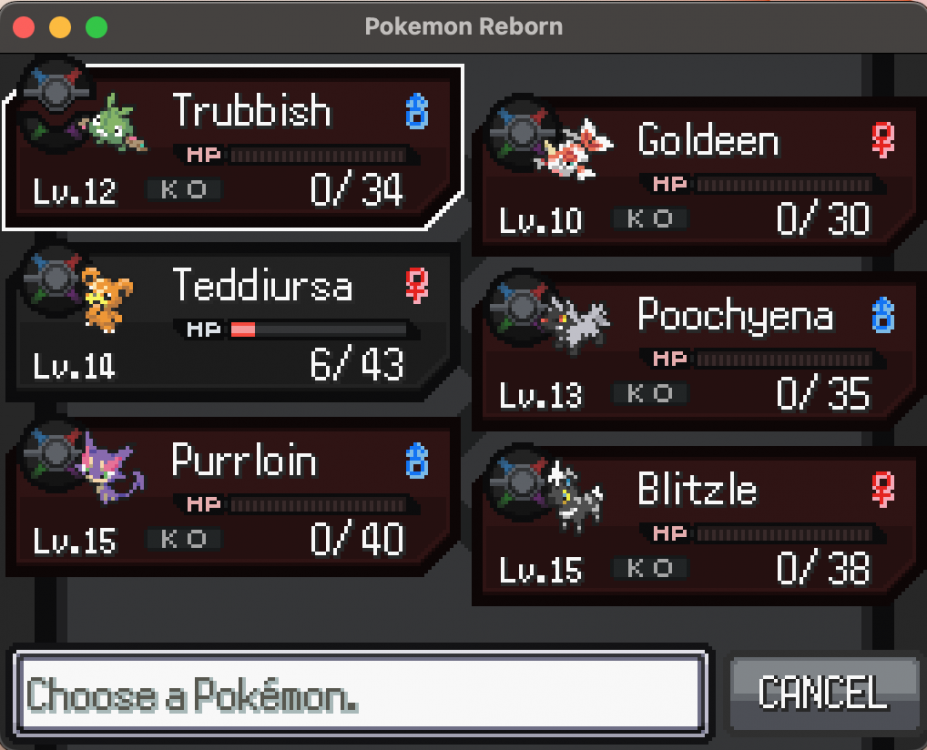
-
Hello! In this playthrough I will attempt to beat the game without gaining experience points. I don't know if it has already been done by someone else or if it's even possible but I will try nonetheless. The rules are the following: noexp password is active (No experience points are gained from battles) stopgains password is active (No EVs are gained from battles) Rare Candy item is banned Exp Candies are banned Daycare is banned Set Mode No items in battle (Held items are allowed) Not a rule but weathermod password is active, so that I have easier access to pokémon that are locked behind specific weather conditions. First Badge The first difficult fight of the run is the Julia Gym battle. The team I've used for this fight is the following Here's the strategy that I've used. Lead Trubbish and set 2 layers of Toxic Spikes. Then switch into Goldeen and defeat Minun. Oricorio is sent out, sacrifice Trubbish and go into Blitzle that defeats Oricorio with Charge + Shock Wave. Voltorb is sent out, damage it with Blitzle before fainting. Poochyena revenge KOs with Bite. Pooch goes down versus Plusle. At this point try to stall Plusle and Geodude with Purrloin Sand Attack and Goldeen switching into electric attacks and wait for them to go down due to toxic poison and damage from Pursuit and Horn Attack. Electrode is last and quite tough, the idea is to defeat it with Fury Swipes Normal Gem Teddiursa and the toxic poison, but a Charge Beam/Sonic Boom miss is likely needed. I got lucky and on my winning attempt Electrode used Rollout against my low HP Goldeen and with two Fury Swipes + poison I was able to defeat Electode and avoid Aftermath, since it died to poison after my second Fury Swipes did two hits leaving it low.


-
Badge 2 completed in 95h38m total time! (29h01m for this section) Florinia section's completed! Took me less than half the time for section 1. Grand Hall trainers having 'mons in the early 20s really increases the experience gained per battle making it easier to level up high level evolutions. For weaker mons Onyx Rooftop and Obsidia Alley or Obsidia Park are good places to train depending on typing, especially the Tranquills in the rooftop give a solid amount of experience. Got 11 Rare Candies in this section, I've used them for Vanilluxe (6) and Klinklang (5). I have obtained 79 new Pokémon in this section. See y'all for section 3!


-
Yup I'm using the Location spreadsheet for Ep.19, thank you for making it, it's very useful! About the Evo Stones, yes I'll try and get everything I need with mining. I have a lot of Blast Powder from mining so I'll be able to mine rock twice. Also I'll save and soft reset in from of every rock and I'll reset until I get a Stone or other stuff I need
-
Badge 1 completed in 66h37m! The pre-badge 1 grind is over! 66 hours and 37 minutes of game time, 89 total dex entries. The hardest part of the challenge is done, still there will be a lot of captures and training, but I'm excited to finally move on! Got 17 Rare Candies from Pickup and those helped me especially with Noibat (11 used) and Tynamo, which is in the Slow exp group (5 used). I've used 1 for Loudred as well to get it to level 40. Overall it's been a hell of a grind to evolve every Pokémon that I could get, but it feels so rewarding when finished! Here are the boxes at the end of this part.


-
Hello everyone! I've downloaded Ep.19 about a week ago and I decided to do a playthrough of the full game doing a Professor Oak Challenge. For those of you who don't know what this challenge is, here is the general main rule: - You must obtain all possible Pokémon before each badge, before challenging the elite 4, and/or other checkpoints that are game specific. This means that I'll have to catch and evolve every obtainable Pokémon before each badge. I've also decided on these other rules: - Rare Candies from Pickup are allowed, not from Candy Shop - Exp. Candies are NOT allowed - I'll not change date or clock manually - No passwords will be used. I'll play the game in its "regular" form (Except "weathermod" for the next point) - Weather changing mod is allowed only if I'm about to finish training everything and still have to get weather related encounters because the correct weather wasn't available. I'll try to get everything regularly if possible otherwise - Exp. Sharing items are NOT allowed - No speedup So far I'm in the middle of the grinding before Julia. The first sections definitely will be the hardest because of the low level cap and experience available with trainers or random encounters. I have a pickup squad in order to help out with the highest level evolutions as the experience gained becomes very low the higher the level, considering I'm fighting against mons in the low 10s when I have mons over level 30. Disobedience is annoying but it's not too terrible. Once the Pokémon I'm raising is able to one shot the opponent's Pokémon it gets quite easy and reduces the turns, lowering the disobedience factor. So far here's the progress: 72 Dex entries, 35h05m playtime. I'll post an update once I've completed the first section (might take a while :D)
-
[TRADED AWAY]I have lots and lots of 5 IV Feebas
crikson replied to Unfair Paradox's topic in Online Play
Thank you! -
[TRADED AWAY]I have lots and lots of 5 IV Feebas
crikson replied to Unfair Paradox's topic in Online Play
Hi I'd love to get one! My username is crikson, I can trade now if you are available. If you have another one with all 31s except for attack it would be great -
Yeah sorry I dind'nt notice it was about Rejuv, my bad
-