

Matt.
-
Posts
24 -
Joined
-
Last visited
Content Type
Profiles
Forums
Events
Reborn Development Blog
Rejuvenation Development Blog
Starlight Divide Devblog
Desolation Dev Blog
Posts posted by Matt.
-
-
Chapter 15! This probably won't be my last post because patches came out after I had began posting, so some stuff had changed.
Axis High Sliding Puzzles:
SpoilerCTRL+F "red box"
U = up, D = down, L = left, R = right
Top Left Terminal: URURULDRDLDR
Top Right Terminal: DLULURURULDRULULD
Bottom Right Terminal: DRURDLDRURUDLDLRURDR
Bottom Left Terminal: DLULURURULDLCorrections:
Spoiler- "After the rest of the cutscenes" - during these cutscenes, say "I've been great" for RP
- "Talk to Narcy" - she's by the sign in front of her house, not east of the Pokemon Center
- "Talk to Narcissa once" - need to add the part about how you use Dark Pulse/Night Daze in battle to change it to Dark Crystal Cavern
- "consider paralyzing it" - you cannot paralyze it because it's an Electric type. You can put it to sleep though, and it'll take damage due to the field. Wide Guard is also helpful for blocking discharge
- "thing at the table" - the only one of the 3 options that is selectable is Path 1, so the player isn't given a choice here
- "Zcell 105" - if you've already gotten the Zygarde Core, I think that disables all cells after, because I got the core before coming here, and this cell and cell 106 don't appear for me
- "Grigus" - it's Gregus (there are 4 instances of this typo)
- "enter your building" - enter the top left building. Answer these questions however you like. Then, say "What?" to not lose relationship points.
- "Then when you return" - the first thing you do after returning is, say "I'm hungry" for relationship points
- "Watch all the scenes play" - during these scenes, say "Don't let her get to you" for max relationship points
- "I'm going too" - saying this gives +3 with Aelita, but saying "I hate this" gives +3 with Erick
Suggestions:
Spoiler- "Dark Pulse or Night Daze" - in case people didn't bother getting the Spiritomb, probably better just to say that we already have the TM for Dark Pulse. Also, remind the reader that it's helpful to bring something with Flash. And specify where to Rock Climb in Phasial Cave - it's around the left/lower left side of the cave.
- "den of souls via" - you can visit the Den of Souls as the MC immediately after finishing the Pearl Route (even before beginning the Platinum Route), so it's worth moving the section up as optional because you get a Mega Stone and some TMs earlier than the guide indicates. The Dragon Memory isn't available until after the Platinum Route (I would also move the quick sentence on this to after the Platinum Route), but everything else is available immediately after Pearl. Also in this section there's a typo on Relicanth in the encounters.
- "Manectite" - this is just one quick sentence to move it to the part where you mention Aevian Litwick in Axis Factory. Again, these candies and Mega Stone may be helpful for the gym/Geara fight. Also she gives you 30 candies - the number isn't specified
-
Chapter 14, dive stuff, mints, and RP.
Mints:
SpoilerThere are lots of mints you can now find around the world, and mints (even the ones that give lesser-used natures) are so powerful that they're definitely notable enough items to be pointed out in the guide. Some mints are visible pokeballs on the ground and some are hidden - I've noted which ones are hidden.
- Route 1: https://gyazo.com/e48fc08b5cf29951379bb3b6ae6341b7
- Amethyst Cave: https://gyazo.com/fc04da89598b52c239c893d2e16304aa
- Pom-Pom Meadow (hidden): https://gyazo.com/d474a53a3efdf87562fc200382432fda
- Sheridan Village: https://gyazo.com/38b8f348e36a2e516451e6c145e1df41 - I had already picked it up, it's a non-hidden Timid Mint in this little land area
- Route 3 (hidden): https://gyazo.com/78fa5e47f46a65cdced9894d249b5fac
- Route 3 (hidden): https://gyazo.com/2f4b80420b6fdd417b3a7388ffa45eb8
- Forgotten Path: https://gyazo.com/f7e10a54a06995bbd6599df741c6d600
- Wispy Path (hidden): https://gyazo.com/473b4ff6c74e9c3f87e8f696a6f22df6
- Wispy Tower (hidden): https://gyazo.com/435d44666b1541fb3125ab3b654a701f
- Akuwa Town: https://gyazo.com/943e69896ac918fe9a98ca3086bde9b6
- Route 11 (hidden): https://gyazo.com/e997dadff6fd95697da468833c18ad84
- Route 11 (hidden): https://gyazo.com/ed6c187cf7f52dfa9e283326c9c43476
- Terajuma Jungle: https://gyazo.com/71578cfef23ee9ae32fbd0d92c8c2293
- Jirukala Cavern: https://gyazo.com/eb0a5b3453b81ab07943c8f5a4ecbbfc
- Safari Zone: https://gyazo.com/d6eeceb869e55865e65bbf395a8b68be
- Teila Resort: https://gyazo.com/21791f792352670a503c16c934461778
Relationship Points:
SpoilerHere is the RP guide: https://www.rebornevo.com/forums/topic/56219-rejuvenation-relationship-guide-v13/. According to it, here are things that are missing.
- Chapter 2: Aelita: I don't know if I can do it alone. So I'm asking you a favor... Please help me look for Sensei! (Say "Yes" for RP)
- Chapter 5: Neved: I rarely, truly, feel fear, but that day... (Say "Where's Aelita?" to not lose RP)
- Chapter 5: Adam: Wait a sec, this kit has the name "Billy" written on the side of it. (Say "I won it" to not lose RP)
- Chapter 5: Beauty: All three of you are just completely useless! (Say "Calm down" for RP)
- Chapter 5: Aelita: \PN... I... I didn't want you to see me like... this. (Say "Are you okay?" for RP)
- Chapter 5: //Talk to Nim after the Ship gets relocated// Nim: Don't worry about me, \PN... This'll pass... I hope... (Say "Are you okay?" for RP)
- Chapter 5: Valarie: Looks like you win this one, \PN. (Say "You're strong" or "It was pretty even" to not lose RP)
- Chapter 6: when battling the Carnivine before Geara2, defeat it (as opposed to running away) for max RP
- Chapter 6: the guide has this: Terajuma Jungle event while you and Melia wait for your friends to gather to speak with Crawli. (Melia +2, Aelita +2) - this is referring to something else other than getting RP with Melia if you've defeated RiftGyara2 - do you know anything about what this event is?
- Chapter 6: //While befriending Growlithe interact with Aelita// Aelita: That looks like a ton of fun... Can I play too? (Say "Join me" for RP)
- Chapter 8: //Storysplit choices after not getting Magma drift and after defeating Kyogre// Venam: But I should try and change that next time I see her. (Say "Don't wait till it's too late" for RP)
- Chapter 8: //Storysplit after not getting Magma drift.// if you ignore Venam @ Chamber of Awakaning and go straight to Valor Cliffside, you will lose RP with Venam
- Chapter 9: When Venam asks you about what is at the top of Valor, say "A Forest" and you will get a bonus question, which you say "Intuition" to for max RP
- Chapter 11: If Darchlight Cave with Florin, exposed Flora when given the chance, and had tried to tell Cassandra, you will lose RP with Erin
- CTRL+F "LUURULDD" - get to Melia before the timer runs out for RP with her
- CTRL+F "head up and to the left for one" - say "Define okay" for more RP
Corrections:
Spoiler- "Pokemon Hospital south" - it doesn't have to be at night (you just speak to the lady at the counter on the right twice - specify this so people know which person to talk to), it only costs $10,000, and it's available much earlier than where it is in the guide. I'm not sure exactly when it opens up, might be immediately when you get access to the district.
- "Left-Middle" - it's Icy Wind for 1 big mushroom, not Pain Split
- "electric type in V12" - v13
- In the Marble Mansion in the past, you can get toilet paper by talking to the top-right plant in the entrance room. Take this to the bathroom in the restaurant to receive Black Sludge. I'm not entirely sure when this opens up because I found it much later, so probably just put it in the same place as it was in the v12 guide.
- "Mech Battle" - here are instructions for the Sakitron vs Amanda mech battle
-
This mech-battle is essentially a more complicated version of rock, paper, scissors. Each turn, one of Sakitron's attacks will become a critical hit depending on what Amanda says before the turn. Here are the things Amanda can say and which move you should use when she says each one. "Now... Just how are you going to top this move?" -> use Saki Hammer "You won't be able to win. How much more need I hammer that idea into your head?" -> use Saki Bash "I'll bash you to pieces" -> use Saki Topple "You aren't prepared... None of you are prepared..." -> use Saki Tank Engine - "stand on the red switch here" - there is a missing instruction after this instruction. It should read "As MC, position yourself above the red bridge in the middle."
- "cross the blue bridge at the left" - the words I put in the quotations need to be deleted, then it is correct
- "guided Allen" - Unown Buster is your strongest attack and you should open with it. Here are how to get critical hits after that:
-
"Ever been slashed across the face with a drill? Wanna volunteer?" -> use Unown Buster "How you're doing all of this is unknown to me..." -> use Extremespeed "Try outspeeding this attack!" -> use Wind Slash "Fear the light!" -> use Light's Embrace - "with hoverboard dude" - it's the room after hoverboard dude
- "Swift Swim Scald" - it is not possible to have the Scald TM at this point, and the only pokemon that learns Scald by level-up that is obtainable is Simipour, which does not have Swift Swim
- "Rife Essence" - typo
- "Grand Hall" - should be Gearen Lab, unless this was an intentional Reborn reference!
- The woman who wants to trade Rockruff is still there in Neo Oceana Pier
- "Kawopundunga" - slight typo, it's Kawopudunga
Suggestions:
Spoiler- "There is a catch" - I think losing this battle gained you relationship points in v12, and might still in v13 even if the music notes don't appear, so if that's the case, should we mention that as is the theme with all relationship point stuff, rather than keeping it a mystery?
- "luckily nothing as bad" - the best play on turn 1 is to switch Delpha out as you knock out Mismagius. If you do this, the fight is extremely easy from here.
- "TM105 Arenite Wall!" - mention that at this point, GDC has opened back up
- "HM02 Fly!" - note that you can't fly into GDC, so you need to walk there from Yui's Ranch or Route 9, but you can fly around inside of and out from GDC
- "You’ll see Scyther" - to be a bit more clear on the location, go southeast from the entrance and rock climb up
- "Mall Opportunities" - maybe mention that these are purchaseable on the 5th floor of the department store. The player doesn't have access to it at this point in the guide but could be worth mentioning if the player wants to come back later and finish this.
- "Chase this Heracross" - I mentioned this in a previous post, but here's a GIF: https://gyazo.com/f58d70c88db67ec2febf6c1513070350
- "Exit the castle now" - by interacting with the teleporter pad on the ground outside the castle, you can warp to the surface
- In the description of this video are maps of all 4 floors of the Zorrailyn Labyrinth with colored routes that show paths to collect all items efficiently. Because visuals are easier to follow than words, I feel that both times the labyrinth is mentioned (when you first visit it, and then later after you have Dive), we can just replace the instructions with those images. Also I confirmed that although this is from V12, the labyrinth has not changed in V13: https://www.youtube.com/watch?v=gGLAQjCpn7Y&list=PLEc4j2-lT1DqwY-zLiSNFnLfMjxErjLZt&index=75&ab_channel=NineIcyTails
- I know I'm suggesting something like this yet again, but because you can use Dive immediately after beating Adam, I feel that the Dive section should be moved up to this point. We wouldn't have the Enigmatic Key yet so that stuff would have to be kept at its current point, but the current dive section is currently post-Ryland, an entire badge later than it's available. You get lots of useful tools from dive such as screens TMs, new pokemon, crests, etc., that we want to mention before tough fights in chapter 14.
-
Chapter 13 and fly stuff.
Corrections:
Spoiler- "Sashila Move Tutor" - doesn't appear until after you beat Adam
- "up and to the left, use" - it's down and to the left
- "Hiyoshi City Move Tutor" - in addition to the 2 listed, also teaches Gravity for 2 blue shards and Recycle for 2 green shards
- "in v11" - this sentence is outdated
- "250/500" - it's 250/500 for defeating common/rare rifts, and 500/1000 for catching common/rare rifts
- "Put in 15000" - I'm not sure if this is what the devs intended, but here's how it works right now. You need to have 15000 in your bag after putting some in. I had 16000, put just 1000 in, and it immediately worked. And it's Rift Fragment, not Rift Matter
- "let it Take Down" - it doesn't have Take Down. Its moves are Life Dew, Zap Cannon, Iron Head, and Gravity
- "Return to the past again" - return to the past again, replant the sapling in front of Sheridan Village, return to the present, and give the guy on Route 2 the notes. Also, on the Zygarde Cell immediately after this, here is a correct picture (that doesn't have Floette): https://gyazo.com/93984ad79aa06e11febbe88dd418bf34
- "Fly there" - you cannot fly to Neo East Gearen if you haven't been there yet. You have to go there on foot, from West Gearen for instance
- "TM80 Rock Slide" - In the cutscenes immediately after beating Adam, Reassure Amber for more relationship points
Suggestions:
Spoiler- "SSCave1" - I really think that both this section and the section immediately after (ZorLab1) should be moved up in the guide to when the player first reaches Sashila. I confirmed that you are able to do these two sections of the guide at this point, and I think it's much better to cover them earlier so that the reader knows they have access to these areas sooner than later. For instance, the reader will know they have access to these new Pokemon and all of these new crests before the traditionally difficult Angel of Death Gardevoir fight. You can't quite do everything in the Sand Steam Cave yet as you don't have the Scented Lure, but I still think it's definitely better to move these two sections up, and then after Sashila Novae, include the quick note that you take the Scented Lure to get Trapinch/Vibrava. You can say the usual "these areas are optional and have things you may find useful, but feel free to skip ahead if you want." I just think things should be covered right when they're available and neither of these are a big detour.
- "Glaceon: Resists Rock" - also makes Glaceon take 1/16 from Stealth Rock
- "I recommend training this Sylveon" - this was from V12 and it was for AoD Gardevoir, but you no longer mention this Sylveon during the AoD comments. Of course, in V13 Misty Terrain is an overlay. Could still be useful for preventing status but just pointing out that you never mention the Sylveon after this
- "enter the gallery here" - mention that after you enter this gallery, you'll be locked out of the entire region for a little bit. There's a boss fight coming up so it's worth mentioning
- "you’ll get HM02 Fly!" - like the first suggestion, I think the entire Fly section should be moved here, because you can fly immediately upon getting the HM - you don't need Adam's badge. Again, I think the philosophy should be that we let players know that a bunch of stuff is available right when it's available, especially if it helps for multiple upcoming difficult battles. And you already have the note saying that readers can skip this section if they don't want to do it, so no harm done. It may seem neater to have all the fly stuff in one section, but doing stuff immediately when it's available is not a detour or inconvenient because we have fly. It's just like how you have the Floria Island surfing section right when it's available.
- "TM128 Weather Ball" - if you follow my above suggestion of moving the fly section up, then both the Castform Crest guy and Squirtle don't appear until after you beat Adam, so you'll need to keep just this paragraph after Adam
- "We can fly now" - mention that you press PgUp/PgDn to flip between the islands, this is a common question I see
- "make your way to Sheridan Village" - make a note that the move relearner now teaches egg moves!
- "Next, head to Wispy Tower" - I'd say "fly" instead of "head" because people might not know Wispy Tower is a fly spot
- "head down to the depths" - maybe say head down to where you fought Crawli to make this less vague
- "Gearen Park (Neo)" - the encounters here are listed as being morning, but no other encounter tables are listed
- "10Route1" - I know, it's another one of these suggestions, but Route 10 is available immediately once you get the fly hm. Pidgeotite is not there at this point, but even though it might seem more clunky, I still think this section should be moved into the fly section, and then Pidgeotite (which opens up post-Adam) can be mentioned then.
- "watch the following cutscene" - mention that immediately after you beat Adam, you will be locked out of GDC for a bit, so make sure you do what you need to in GDC beforehand
-
Stuff in chapters 11 through a bit of 13 so far:
Corrections:
Spoiler- "Pick up the Toxic Orb" - this is no longer here
- "Dream District West Spice Store" - no longer sells Revival Herbs
- "Head over to Pokestar Studios" - first, you have to talk to the people left of the medicine shop who are blocking the doors. Dylan won't appear until this is done.
- "Buy a Nightmare Medallion" - buy two, one for you and one to give away for a quest later (it's to give to Anabel in the second help quest)
- "attempt to go to sleep in your room" - first, attempt to leave, then Alice will tell you to go to sleep
- "grab Psychic Memory" - it's in the top right, not top left
- "just once" - not just once, you can battle against this breeder multiple times and you get the candies each time
- "Save her from Sableye" - Sableye will only appear if you speak to her next to Miku's Cafe before saving her in the Nightmare Realm
- "Return to the driver in the gatehouse" - there are no longer gatehouses, he's in Central Square
- "Garufa Spellbook" - it's on the table, not in the cabinet
- "Kenneth in the cave. Go to sleep" - after going to sleep, you fight 2 grunts on your way out of the cave, then you end up in the jail cell
- "sufficiently set up this may work" - After fighting Melia here, when you go up the lift, you'll get a prompt. Choose "About what?" to not lose relationship points
- "Tell Melia “Are you okay!?”" - this happens after you choose whether to hand the time diamond over, but before you battle Emma as Melia
-
"Well, back in the Rose Theater" - delete this whole sentence because this is no longer done. Also, before this, add a note that the healing station and pc are finally open. Such as:
-
Talk to Spacea and Tiempa, then take the crystal home.

Back in the Rose Theater, the room behind the crystal is finally open, which contains a healing machine and a PC.

Remember the GDC arc?...
-
- "Catch some z’s" - before this bullet point, another bullet point needs to be added saying "Reenter the room, and give Anabel a Nightmare Medallion"
-
"took the Beheeyem route" "Beheeyem is your man" - it's a Claydol. Also you can only use Claydol to teleport if you didn't expose Flora, meaning from a convenience standpoint, that is the superior route as exposing Flora locks you out of GDC for the time being. And an unrelated suggestion, but in the oasis, itemfind around this area for the new Haban and Petaya berries
Suggestions:
Spoiler- "Make sure you’re ready to not come back for little while" - also recommend Luvdisc farming for Heart Scales because of the upcoming nature changer, and we won't be able to get Heart Scales for a long time once we board the train
- "give him a Blue Shard" - add a note that you can Google "Timburr puzzle strategy guide" to be taken to a guide that tells you how to solve this type of puzzle, because this puzzle gives people lots of trouble
- "Make your way south, east" - this is just simply, after having the driver take you back to Kugearen, go straight east and you'll reach Sheridan
- "Chase this Heracross" - a lot of people have issues with this puzzle, so more elaboration is probably helpful. You want to force it to the very right side of the forest, then sneak up on it from behind by walking on a semi-hidden row of tiles below the branches.
- "Head down one level" - it's up one level. also mention that 2 floors up from the jail, in the room on the left, are a healing star and a pc star
- "SashVil1" - mention now that you've reached Sashila Village, the Mudsdale fast travel guy appears right outside the village
-
Here's some stuff in Chapters 8-10.
Corrections:
Spoiler- "Time for a 11v11" - it was 12v12, but actually on intense/normal they removed 2 mons in the 13.03 patch so it's a 12v10. Maybe just say "time for a double battle"
- (I believe this opens after you beat Rift Carnivine) On the west side of Lover's Bridge, you can see a cutscene, then a girl requests you to give her 20 Sitrus Berries. Once you do this, she will become a vendor who will sell Growth Mulch and Stable Mulch, both for $200. Say something like "In a couple badges from now, we'll get the ability to farm Sitrus Berries very quickly, so feel free to come back to this later if you want." I'm referring to headbutting the apple trees in Jirukala Cavern, so perhaps in the Rock Climb section of the guide, a quick note can be added saying that you can farm Sitrus Berries here if you want the Mulch store.
- "enter the house in the middle of the bottom of town" - it's the bottom right house
- "Whimsicott, Level 51" - it's holding a Focus Sash, and the line above should be Mountain field. Rift Chandelure afterwards is also on Mountain field
- "scene, you’ll be free to explore" - you can go left into the garden and talk to Anathea for a short cutscene
- "Speaking of Toxel" - the artist who gives you the Nature Power TM now wants to see an Emolga instead of a Toxtricity. Emolga is found on Route 4. Therefore, this whole set of sentences can be removed and moved all the way up in the guide to when you first get to Route 4. Also, because you now get a guaranteed Magnet way earlier, you can edit the discussion of the Magnet in the Type:Null quest.
- "Enter the easternmost house," - after entering and exiting Kelvin's house for the first time, head to Luck's tent (the map west of the train) and talk to Melia for a cutscene. On her second prompt, "Hapi?" is the better answer.
Suggestions:
Spoiler- "Talk to Reina in here to get a Dusk Stone" - you can battle Reina infinitely and she gives over $5000 each time, so this is a good way to farm money, especially because it's a 2v2 doubles battle so you should be able to win the battle in just one turn. Also mention that this opportunity disappears after leaving the gym.
- "enter the upper left estate. Head upstairs" - there's a PC and a bed in the upper left room
- "Of note, you’ll find a Dusk Stone" - also there's a Telluric Seed
- "Electrizer and Magmarizer" - in the Electrizer room, there are two Cell Batteries on the ground next to the Electrodes
- "fly to Theolia" - can't fly at this point so say travel
- "a little while, so I recommend" - mention here that you need 8 sitrus berries (can farm the headbutt tree) for Miltank, sap sipper Miltank may come in handy vs the next gym
- "Been a while since we walked onto a new route" - most people would think to do this but because it may not be 100% obvious, might as well mention you can reboard the train if you need to heal or need a pc
- "Head west into the Honec Woods" - battles fought on Swamp field/Murkwater depending on whether you're in the grass or the water
- "talk to any of the people here 30 times" - mention that this is for Spiritomb so people can decide whether or not they want to do this
-
 1
1
-
I wrote up instructions for the Garufa Statue Puzzles. Putting them in a separate spoiler to avoid clutter.
Garufa Statue Puzzles
SpoilerFirst puzzle is trivial
Second puzzle:
- Pangoro left all the way, down all the way, right 2, up 2, right 3, up 3
- Zorua left all the way, down all the way, right 2, down all the way, right 3, down 3
- Apple right 4, up 2, right 3
- Chimecho right all the way (it’ll be stopped by the Zorua), up all the way, right all the way, up 2, left all the way
- Zorua left 1
- Budew left all the way (it’ll be stopped by the Zorua), up 3, right all the way
- Zorua right 1, up 3Third puzzle:
- Omanyte right all the way, down all the way, left 1, down 4, right 7, up 3
- Zorua down 1, right 2
- Pangoro down 8, left 4, up
- Starly right 2, down 2
- Zorua left 1, down 1, right 1, down all the way (it’ll be stopped by Aelita), left 7, up all the way
- Starly right 1, up, right all the way, up all the way, left 2, up 8, right all the way, down 2
- Chingling up, left 3, up 8, left all the way, down, left 2
- Darkrai right all the way, up all the way, left 2, up 8, left 1
- Apple down 1, left all the way (it’ll be stopped by Darkrai), down all the way
- Darkrai rightFourth puzzle (Optional):
- Pink Shellos left, down all the way, left all the way, down 5, left, down all the way, right, down all the way
- Starly up 1, right all the way, down 1, right 2, down 6, left, down all the way, left (it'll be stopped by the Apple), down all the way, left 1
- Apple right 1, up, right 1, up 7, right, up 7, left all the way, down 5, right 1
- Omanyte right 1, up 3, right, up 7, left 3, up 1
- Lopunny up, right, up all the way, left, up 3, left 7, up all the way, right 1, up 7, right, up 7, right 4, up, right, up
- Shinx left 2, up all the way, right, up all the way, left, up 3, left 9, up 5, right 1
- Pink Shellos right 5, down all the way, right, down all the way, left, down 3, right all the way, up 2
- Blue Shellos up 1, left all the way, down all the way, right, down all the way, right 5, down all the way, right, down all the way, left, down 3, left all the way, up 2
- Starly right 10, up 2, right all the way, up, right 2, up all the way, right all the way, up 1
- Darkrai up, left 2, up 5, left 1
- Slugma left all the way, up, left all the way, down, right 1, down 5, left all the way (it'll be stopped by Darkrai), down 5, left 3, up
- Darkrai right 6, up all the way, right all the way, down all the wayCorrections:
Spoiler- "Accept the fast travel and enter the left room" - these instructions are a little confusing. I would reword them as "Accept the fast travel, step on the pad, and enter the left room. Exit the room and surf across to the right and go all the way down the vines and out. Itemfinder around here to get a Moon Stone! Step on the pad, then go up. Head up to the battlefield."
- "We also now have Magma Drift" - First of all, Aevian Paras requires Spice Powder to battle it, so mention this first so that the player has some before they make the trek into Carotos. Anyway, as a related suggestion, I think this section should be moved up to immediately after we get Magma Drift because you get some stuff that could be useful for Valor summit, which many players find to be challenging. I know you get Magma Drift at two different points depending on your Magma Stone choice, but I think this is still worthwhile. Also, in the next sentence after that one, you don't need to clear one spot from your party.
- "and enter the base" - when going upstairs, free Reina from her cell for relationship points
- "activate the Neutral Source Crystal" - delete the next sentence about the Hyper Potion (or move it a couple sentences later) because after activating the Neutral Source crystal, we want to go down, not up. Going down, we get the ZCell the guide mentions, but also, if you keep going all the way down, south of the base, there's a wild Heracross!
- Immediately after activating the Ice Source Crystal, there is another ZCell to the left that isn't mentioned in the guide. Sorry... I know this means every one after this will need to be renumbered: https://gyazo.com/4589420b7b6d545daa23ccc0738e7937
Suggestions:
Spoiler- "Madelis will give you the HQ Railnet Key" - I think the Mudkip section should be moved to right after this point, again because you can get some cool things (Swampert, Damp Rock, Fighting Memory) that may help players with the traditionally difficult Valor summit. You can start by saying "now that we have the key, we have some stuff we can grab that may help with the upcoming battles, but if you're not interested you can skip ahead"
- "Enter Xen Lab from its left side" - would say "Surf straight up, and enter Xen Lab from its left side" as finding your way around the wetlands is a bit confusing. Also, on the topic of the Xen Lab, in the final puzzle room there's a panel on the left side that isn't required to progress, but says "Panels somewhere in the factory have changed..." - do you know what this does? I can't find any info on this.
- "TM147 Tail Slap" - reword this to "hiding behind the Ice Source Crystal, then activate it" because it's vague where the TM is
-
1
-
Like my last post, I've been taking notes as I do my playthrough, so I'll periodically make posts here as I continue to make more progress. Same deal as last time. Thanks!
Corrections:
Spoiler- "AP Shop" - EV training rooms are available when you are able to go back to Gearen for the first time after being on Terajuma, so this would be via the Route 5 boat guy. Each of the EV-training rooms has their respective "Power" item in it (for example, the Speed room contains a Power Anklet on the ground). And while we're here, it's also probably worth mentioning that the Exp. Share gives EVs for maximum efficiency.
- "Grab the TM123 Self Destruct" - this TM is now in the Safari Zone special beach area that's unlocked by doing all of the Kakori help quests
- "On your way out, you’ll see a cutscene" - after beating RorimB, you can accept fast travel to the Terajuma shore. If you accept fast travel, you don't see Jenner's Pokemon psychology video cutscene, but you do if you decline fast travel. And you talk to Rorim, not Augustus, to go to the Secret Shore
- "Enter the living room on the right" - you say "This is Tesla's House" immediately upon entering the house, then after that you go into the living room. Also at this same point, there's a vending machine in the living room you can buy drinks from: Fresh Water $200, Soda Pop $300, Lemonade $350
- "Afterwards, after a heartwarming scene" - right before Tesla gives you the yacht keys, there's a prompt, and say "Thank you..." for max relationship points
- "Enter the Poke Ball shop in the southeast" - TM/RM shop, not Poke Ball
- At the right side of the Teila Resort beach, a Black Belt move tutor appears who teaches Aqua Tail for 4 Blue Shards, Magic Coat for 4 Blue Shards, and Electroweb for 3 Yellow Shards. He's not there when you first get to Teila Resort, but I checked right before battling Angie and he was there. Not sure exactly when he pops up.
- "Now, take the stairs to the right" - immediately before this, you're with April, so this instruction of taking the stairs to the right doesn't make sense. A sentence needs to be added before this one saying something like "return to the first room in the cave"
- I know this is tedious, but I think encounter lists need to be looked at again because I think at least several are outdated. For example, I found Silicobra in the area where you get Poliwag in Phasial Cave.
Suggestions:
Spoiler- "If it is raining outside" - battles in the Wetlands are fought on Swamp field. You usually note this sort of thing for other places
- "Now we can take the boat to return to Gearen City" - specify this is Rorim at Terajuma Pier, meaning you no longer need to pay the guy on Route 5
- "Talk to the guy below to get TM05 Roar" - similar to my first note, battles here take place on Crystal Cavern field
- "Return to Augustus, and from there" - it's better if this whole section is done before going into the living room after Madelis&Bartz and progressing the story, because then you can use the yacht to more quickly go back to Gearen and don't need to go to Augustus (whose ferrying services are replaced by RorimB in V13 anyway). If you go into the living room first, then Melia/Venam will be blocking the yacht because you're about to head off to Kristiline
- "Grab the Shed Shell to the south." - encounters for the Isle of Angels and Kristiline town are labeled as Cave instead of Grass
- "This one has no cool down." - this sentence from V12 is no longer relevant due to how V13 changed the move relearners. also mention that you can talk to her sister for a free Heart Scale
-
 1
1
-
Thanks for all of your work on this guide and updating it so quickly for V13! I am referencing the version you updated yesterday. I've split my comments so far into two categories. "Corrections" are things in the guide that I believe are incorrect, and "Suggestions" are quick notes to add which I think will improve the guide.
At the beginning of each bullet point, I've included a few words in quotations. Use CTRL+F in the guide on these quotations to jump to exactly where I'm talking about.
Corrections:
Spoiler- "you can push them to the Lv. 20 cap" - can't really be done because level cap is 15
- "Magical Seed in the isolated patch of green" - checked with itemfinder, this appears to no longer be there
- "After gathering the Joltik located around the forest" - this is no longer done
- "dark moves like Bite are suppressed on this field." - this has been changed in V13, Dark moves are unaffected on Psychic Terrain
- "You’ll wake up in a room" - you wake up in Venam's house, you have to go to that room in the sewers for the TM
- "I had like 117 AP" - I think this paragraph was meant to be later in the guide, but it should be deleted because you mention the Golden Surfboard after Nim2
- "Level up Slugma to Level 38" - the cap is 35 at this point, move this to after Narcissa
- "if you have Flash, use it!" - Flash now temporarily nullifies the field and it turns back into haunted after a couple turns. It never goes to Blessed
- "talk to the grandma to get Dusk Balls!" - all of these NPCs who give you items are now in different locations. Their houses have moved
- "though we will be able to get them later" - is this true? Because there is no other mention of Cramorant in the guide
- "Heal and swap out your party" - there's no longer a healing machine or PC in Neved's room
- "then talk to the four creatures" - this no longer needs to be done
- "We will want two total Spinda" - this Spinda trade is not mentioned anyhere
- "Surf north to get to Valor Shore." - before this, there's a new ferry on the Route 5 beach where you can go back to Gearen. If the section on returning to the first island and surfing around is moved up to this point, then all of the "Good Rod" tables will need to be deleted, or the Help Quest to get the Good Rod will need to also be moved up before this point
- "Berry Emporium (5 Badges)" - the Berry Emporium never updates for me
- "We can get two more T.M.’s now!" - these TMs are available earlier than this. I found them immediately after seeing the Chapter 5 title card (so, right after Narcissa), but I'm not sure if they're available even earlier than that
- "Grab Dragonite’s first letter out here" - the letter that was in the Wispy Tower area has been moved to the west of the letter in the grass area, so all 4 letters are now in the town
- "grab the star piece inside" - the lady is blocking you from going inside the trailer
- "There is also a Link Heart in the green flower here" - there isn't, checked with Itemfinder
- "You’ll find an Electrike here at night" - it's during the day
Suggestions:
Spoiler- "Very useful for grinding weak Pokémon." - grinding at this point is inefficient and unnecessary due to the new Audino trainer on the hotel roof
- When first arriving in Sheridan, it might be beneficial to add a note that the inn charges money to heal your Pokemon, but after just a little bit more story progress it becomes free
- "level your Cherubi to Level 25" - again, not the best place to do grinding even though you have auto heals because it's way slower than using Exp. Share plus the Sheridan Audino Trainer
- "TM117 Pay Day!" - how to farm money is a commonly asked question, so it might be useful to note that Pay Day plus Pickup and selling the items is pretty much the best way to money farm
- "Crests are unique held items" - the game doesn't tell you in the shop menu what each crest does, so I think we should. I believe Noctowl Crest gives STAB to Psychic moves and adds Psychic type resistances, and Phione Crest gives +1 in both defenses and sets Aqua Ring
- "ZCell 016" - the picture has Ditto in it which is not available at this point. Unfortunately I do not have an updated image available - my backups don't go that far
- "I recommend buying a lot of Great Balls" - no need to do this because there's a shop in Blacksteeple that sells these
- "Blizzard turns it into Icy Surface" - I don't think it's possible to have any Pokemon with Blizzard at this point unless you use a ton of Rare Candies
- "Phione for a GourmetTreat!" - now that it has a Crest, it's not so useless anymore
-
1
-
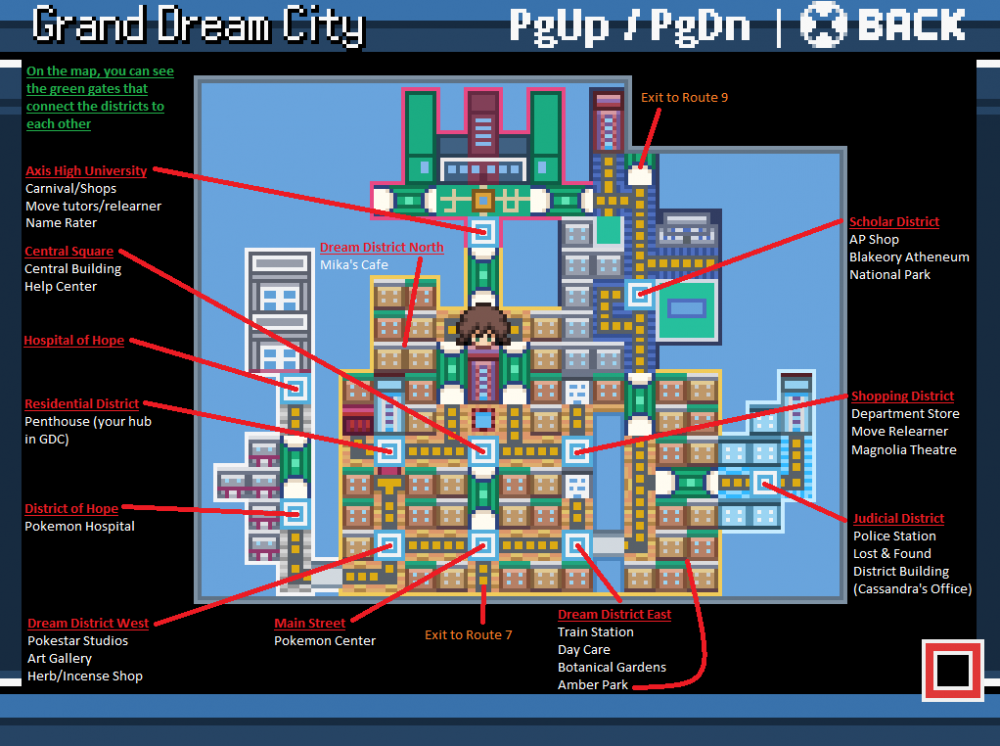
Here's a map I made.
-
Regarding the mechanism by which players change their difficulty level: currently, players get one free change, and every change after costs a couple shards. After a certain point in the game, the player loses their ability to change their difficulty level (excluding Debug, but you know what I mean).
Is there an overall benefit to this system over giving the player more freedom, or even ultimate freedom, i.e. allowing them to change their difficulty level for free nearly whenever they want (or just when they're in a Pokemon Center)? This is what I want to discuss, and I'm not sure that the answer is yes.
It seems the main arguments for the current system are that we don't want to make things too easy for or spoil the player, we want the player to choose their difficulty level wisely and experience the consequences of their decisions, and by taking the difficulty changing mechanism away after a certain point, we want the player to stick with the difficulty level they chose and challenge them to complete the rest of the game that way. And I completely understand these arguments - I enjoy doing restrictive challenge runs and playing intentionally difficult games, and there definitely is such a thing as giving too much to the player.
It may be more helpful to look at the reverse question. Suppose that this whole time, players could change their difficulty level whenever they wanted for free, and this was the norm that everyone was used to. Then suppose that you asked everyone, "Would Rejuvenation be a better game if after your first change, you had to pay for it, and after a certain point you couldn't change your difficulty level anymore?" I suspect most people would say no. Of course, this is natural as obviously people don't like having capabilities taken from them, but isn't the ultimate goal to maximize playerbase enjoyment?
The motivation for this is that players quitting the game out of difficulty-related frustration is not ideal. Of course, you can't (and probably even shouldn't) cater to everyone. But would the player be hurt by being given additional freedom in changing their difficulty? I don't think so. If they wanted to challenge themselves, they would just not change their difficulty level. And is a player who never changes their difficulty hurt by other people having more freedom to change their difficulty? Again, I don't think so.
Curious to see what others think about this subject. Regardless, thanks to the devs for all of the hard work - Rejuvenation is a fantastic game and I'm looking forward to V13!
-
1
-
-
I would like to entertain the idea of a method to enable/disable level caps on Casual difficulty only. If this isn't feasible from a technical standpoint, then instead I would like to entertain there being no level cap, again for Casual difficulty only. Before you say this is ridiculous or pointless, please hear me out.
I realize that Casual is already significantly easier than Normal, with boss fights only having 4 Pokemon, lower levels, weaker Pokemon, and less competitive sets. I also understand that level caps are an integral game mechanic to prevent tons of overleveling and to set a "pace" for the game. And I realize that Casual not the most popular of the difficulty choices.
For the record, I think the devs did a great job with Casual. They went above and beyond to even make alternate difficulty levels. The whole point of it was to make Rejuvenation accessible to a wider audience, and Casual certainly nailed that. So seriously, great job. I just think removing (or adding the ability to remove) level caps on Casual would further aid in that goal.
A lot of people have never played Pokemon before or play Pokemon extremely casually, and for this reason, they still find Casual to be quite difficult. You, the person reading this post, is (almost certainly) astronomically better at Pokemon than the average person, which is why it can be hard for us to put ourselves in others people's shoes (for instance, look at all of the top comments on this video - I know the average Rejuv player is better than the average Pokemon player but you get my point). Essentially, I know that there are still a number of people who find Casual to be too difficult, and I feel that Casual should err on the side of "too easy" rather than "too hard", based on what it's supposed to be in the first place. I know that the devs already did this, and I also know that we can't accommodate everyone. I just think the mode as it is, with this extra feature, would make it perfect.
-
2
-
-
absolute madlad
I'm talking about both you and Gyarados
Even though I know turn-for-turn how you beat Erick, it will always be amazing. You thoroughly proved that Gyarados is completely busted, but also had to be really clever to pull this off. Congrats!
-
1
-
-
Related to the above, I experienced a very weird situation with Silvally Crest in the G/Z fight.
I was on regular 12.2 with debug. In particular, I was using Falirion's personal scripts file that has 12.2, the strength bug fix, debug, and mod support.
I was using Rift Aelita as my Pokemon (in my attempt to solo run Rejuv. Not sure if me using this whack mon has anything to do with it but might as well mention it). On Turn 1, Zetta spent the turn using the Silvally crest. A text box popped up saying "Zetta used Silvally crest" and then he didn't use an attack on that turn.
This happened a while ago so my memory might be a bit foggy, but I jotted down notes about this fight right immediately after it finished and that's what my notes say, and those notes match what I remember happening.
-
- Popular Post
- Popular Post
This thread has lots of spoilers of boss fights.
For a while, I've been wondering if it's even possible to complete a "true" solo run of Rejuvenation on Intense. After tons of attempts and a long grind, I can finally say that the answer is yes (in a way - let me explain).
Falirion completed a Gyarados solo run. In Rejuvenation, there are tons of double battles and they tend to crash the game if you only bring one Pokemon. To get around this, he is bringing two Gyarados for double battles. I wanted to do a counterpart to that - during double battles, rather than giving myself a second copy of my Pokemon, I would give myself a Level 1 throwaway Pokemon to make this a "true" solo run (at least, as true as it can get given the limitations of the game). My run is not "more legitimate" than his because as you'll see, I had to use a Pokemon that is beyond stupidly overpowered in order to do it, and despite how disgustingly broken this Pokemon is, the run was still barely completable.
Completing a "true" solo run of Intense Rejuvenation is so difficult that none of the regular Pokemon can do it. Arceus is nowhere near good enough of a Pokemon to do it, even if you give yourself all of the plates (I tried). I am almost certain that the other best Pokemon (Primal Groudon/Kyogre, Mega Rayquaza, Mega Mewtwo X/Y, Xerneas, etc.) are not able to do it either (for example, how would a single Mega Rayquaza beat Angie?). There are just too many hard double battles that you have to essentially 1v6. Using debug, you can actually use a lot of the alternate forms that you fight against in the game, such as Goomink, rift Pokemon, and so on. This was the key to completing the run - finding the perfect Pokemon that is on a similar level to Eternamax Eternatus, and using a combination of insane strategy, grinding, and required luck to win.
The Pokemon
SpoilerThe Pokemon I used to complete the run is Dufaux, the boss you fight at the very end of Narcissa's questline. It's an alternate form of Froslass and is actually a functioning Pokemon. Here are its characteristics:
-
Form 1:
- Type: Electric / Fairy
- Base: 500 HP / 60 Atk / 250 Def / 130 SpA / 250 SpD / 60 Spe
-
Form 2:
- Type: Electric / Ice
- Base: 500 HP / 60 Atk / 130 Def / 300 SpA / 130 SpD / 180 Spe
-
Ability: Temporal Shift (User is immune to negative stat changes from all sources. Casts Hex at a random opponent slot that will hit in 3 turns. Only one of these Hexes can be active at once. At half health, transforms Dufaux from Form 1 to Form 2.)
- It was made so Dufaux transforms back to Form 1 at the beginning of the each fight, unless Dufaux is under half health, in which case it starts in Form 2.
Here are the characteristics I went with to begin the game:
- Modest nature (Form 1 is too slow to outspeed anything important with Timid, and Form 2 is so fast that I can outspeed everything important without Timid)
- Max Special Attack and Speed EVs
- IVs for HP Electric, as both forms are Electric but Froslass can’t get a good Electric move until the Thunderbolt TM, which is extremely late
Now you might be thinking, "Of course you were able to complete a solo run with this Pokemon, its stats and ability are insane." Yes, Dufaux is completely busted, but as you will see, there were multiple fights that required a unique setup, perfect play, and ridiculous luck to win. This run was quite difficult, despite what Dufaux's stats might lead you to believe. Solo Running Intense Rejuvenation is just that demanding. If you don't believe me, I encourage you to give it a go!
You also might be thinking "Dufaux isn't a real Pokemon, so this isn't a real solo run". As I explained, no official Pokemon can do it, so from that lens a true solo run is impossible and the conversation ends there. Dufaux is in the game's code - all I did was give myself it from the beginning and went on my way. Related to my previous point, this run was barely completable even with this overpowered form. Solo Running Intense Rejuvenation requires a Pokemon at a level beyond any official Pokemon.
Rules
SpoilerHere are the rules that I used for my run:
- Intense difficulty (I cannot change it at any point)
-
I cannot use items in battle (aside from my held item). I did not have the "Items Ban" mod enabled, thus my opponents could use items (potions, etc.) during battle
- Allowing items in battle makes the run trivial, as I could just potion spam.
-
During double battles, due to the game crashing, I will give myself a Level 1 throwaway Pokemon (Abra) that only knows Final Gambit, and I will target myself with Final Gambit
- This was the best option for self-KO, as Self-Destruct could break an opponent's Sash/Sturdy and Memento lowers stats, giving me an unfair advantage. Healing Wish fails if I don't have any other Pokemon to send out.
-
I cannot boost my evasion in any way (Brightpowder, Double Team, etc.)
- If I did this, it would make the run all about whether I can just get good enough evasion RNG, and to me that kind of defeats the purpose
-
I am not allowed to battle with or use any other Pokemon unless it is required to progress the story
- This means I cannot use Pickup
- Any Pokemon I obtain must be immediately and permanently boxed
- This also means I cannot do things such as complete the Forest Restoration Help Quest (I can’t obtain Poliwag/Scyther) and thus cannot access the Kingdom of Goomidra
- I am not allowed to purchase Rare Candies from the AP shop (explanation below)
-
In the actual Dufaux fight, it knows Hex, Thunder Wave, Ice Beam, and Dazzling Gleam. Instead of giving myself that moveset from the very beginning, I will consider these moves as “Level 1 moves” that I can use Heart Scales to relearn. Otherwise, I will be using Froslass’ natural learnset (in V12, Froslass is incapable of learning Ice Beam and Dazzling Gleam, which Dufaux knows).
- I did not have the "Learn Pre-Evolution Moves" mod enabled
Modifying my Pokemon
SpoilerI am not allowed to modify my Pokemon in ways that are not possible at the current point in the story. Here is when I unlock the ability to change certain aspects of my Pokemon:
- Reach Sheridan: I can now relearn old moves
- Reach Lost Camp: I can get EV-reducing berries, allowing me to change my EV spread
- Reach GDC Underground: By doing Help Quest 1 and unlocking the underground, I have access to the Nature Changer
It is not possible to change your IVs in Rejuvenation (unless you breed, but I consider Dufaux to be unbreedable), and therefore I cannot change my IVs during the run. I am not allowed to modify my Pokemon if I do not have access to any of the above features. For example, at Blacksteeple, I cannot access the Move Relearner, so I will not be relearning old moves. Again, the whole point of all of this is that I cannot modify my Pokemon in ways that are not possible.
Debug
SpoilerObviously, I had to use debug to get this Pokemon in the first place. Otherwise, I will not be using debug to gain an unfair advantage. I will only be debugging:
- The Itemfinder at the beginning of the game (the Item Guide says where every item is anyway – all this does is save me time)
-
Max Repels (you get a Smoke Ball at the beginning of the game anyway)
- I am not allowed to sell these Max Repels for money
-
Golden Items
- This is related to my point earlier about not buying Rare Candies from the AP shop. Because I’m not allowed to catch any Pokemon, tons of achievements are not obtainable. However, I need a lot of AP to get all of the necessary Golden Items to progress through the game. To get around this, I decided to debug myself the Golden Items and then disallow use of the AP shop.
-
I will debug myself anything necessary to progress through the story, but will only use it for that.
- I think the only time I had to do this was giving myself a full team of Level 1s so that I was allowed to participate in the GDC Tournament (you need a team of 6).
Moveset
SpoilerHere is the main moveset that was used throughout the game. On certain boss fights, using the move relearner, a move tutor, or teaching a TM was required/very helpful of course, but this was the moveset for most fights:
- Dazzling Gleam (The best available Fairy STAB, fairly strong, hitting both opponents and having benefits in lots of different fields are massive bonuses)
- Hidden Power Electric (The best available Electric STAB as Dufaux can't learn any better Electric move for most of the game)
- Blizzard (Ice STAB when Dufaux changes forms, and completes boltbeam coverage even when Dufaux isn’t Ice type yet. Hitting both opponents is fantastic, but importantly, it changes tons of fields which allowed me to win many boss fights)
- Substitute (Mainly for protection against status, as Dufaux doesn’t really have/need more coverage. Also Dufaux can’t really boost, so this is the best option most of the time)
Starting at Ren5, my main moveset was Dazzling Gleam, Blizzard, Will-o-Wisp, Hex due to HP Electric being poor on Desert Field, and Wisp helping against Ren’s Scizor and the GDC Tournament guy who uses Level 1s with Endeavor.
Major boss fights and how they were beaten
SpoilerAs I was going through the game, I jotted down notes about how I had to win the most challenging fights for Dufaux. If a fight is in regular-colored text, it means that it was a difficult fight, but not overbearing. If a fight is in red text, it means that fight was incredibly tough. If a fight is not listed here, it's because it was very easy and probably beaten in one try, maybe a couple tries at most.
Chapters 1-6
Pretty much every fight in the first 6 chapters was a breeze due to my ridiculous stats, ability, and moves. There were a couple fights that took a few tries, but once I saw how the battle would play out, I would be able to easily select the right held item and sequence of moves to win.
Chapter 7
Angie: Suddenly, it turned up to 100. The correct setup and sequence of moves were difficult to find. Had 52 Speed EVs to outspeed Slush Rush Beartic once I was in my second form. At the start, had to not get high rolls on Rotom and had to not get low rolls on Mamoswine such that only the Mamoswine would die to 2 Dazzling Gleams, at which point Angie healed the Rotom. Then, had to crit the Ninetales so it wouldn’t set up Veil, or had to crit the Walrein on any of 3 different attacks through the Veil. All the while, had to not get haxed (such as crit, Blizzard frozen, Icicle Crash flinched, etc.). Sitrus Berry allowed me to barely survive long enough.
Chapter 8
G/Z: Used a Telluric Seed for the Defense boost. After taking out the first couple mons with Dazzling Gleam and chipping the Typhlosion, I began to spam Blizzard to go from Volcanic Top -> Mountain -> Snowy Mountain. By this point I had taken enough damage to transform, and Blizzard OHKOs everything on Snowy Mountain. From here, I just needed to get decent luck with misses and the AI on all sides and all that.
Amber: Found the right sequence, including abusing her taking turns to use potions, to have exactly the right timing of Hex going off, me changing forms, and getting 2 consecutive Blizzards off so I could get the field to Snowy Mountain before Magma Drift turned it back into Volcano Top. Used Icicle Plate. Had to hit 3 consecutive Blizzards, get a 62.5% roll on Blizzard to OHKO Incineroar, and get a 93.8% roll on Arcanine to OHKO it with Ice Beam, adding up to a 20.1% chance for me to win. I actually had to not get a crit either in the first few turns for the sequence. Interestingly, I beat this Fire gym using only Fairy and Ice moves.
Chapter 9
Rift Garbodor: Had to freeze with Ice Beam/Blizzard, and then have it stay frozen for long enough to KO it. This was the only way Dufaux could beat it and it required insane luck.
Amanda3: Had to have the right sequence of events in terms of sending her Pokemon out in the right order. Also had to not get poisoned by Poison Jab and had to hit Blizzard to simultaneously kill the Torkoal and Rhyperior in the sun. This fight was more brutal than it’s sounding – I almost made this fight a red one.
Chapters 10-12
Even though there are some traditionally tough fights in these chapters, none of them were issues. I did have to take full advantage of the fields in some of them, but the actual fights themselves took only a couple tries at most, often just one try.
Chapter 13
Angel of Death (Phase 1): Going into this, used the move relearner to learn Switcheroo so I could give the Gardevoir Black Sludge. This was pretty much necessary due to it being many times more specially bulky than Blissey – even a crit, Frozen Dimensional Field-boosted Blizzard would do about half. There are wild Delcatty, so went into the battle already asleep (but about to wake up next turn) so that the Ralts couldn’t put me to sleep. Then, I froze Gardevoir with Blizzard, also changing it to Frozen Dimensional Field. For some reason, Gardevoir switched even though the Kirlia used Aromatherapy the turn before, so against two Kirlia I barely had enough HP to set up a sub, as they took multiple turns to break it. All the while, I needed decent luck with Blizzard hitting, and I OHKO’d the first Ralts with Blizzard, which was a roll in my favor but still a roll. If all of this didn’t go right, I don’t think I would have won.
Angel of Death (Phase 2): Good thing I saved during the cutscene. Needed to not stay asleep for too long and needed the Ralts to not use Nightmare. This took more tries than it felt like it should have.
Adam: Needed to not miss any attacks (several Wisps and one Blizzard, even though I had Wide Lens) and also probably not get bad rolls/haxed because I won the fight on 11 HP.
Chapter 14
Lorna: Used Magical Seed, so had to not get bad confusion hax. Set up a sub turn 1, and the Vivillon uselessly spammed Rage Power as I kept using Dazzling Gleam. With Sub, Wisp, the residual Hexes, and a couple of attacks, I was able to stall out the Trick Room and take out Solrock before it could set up another one. From there, I just had to hit Blizzard to win. This was a fight where the sequences of so many events lined up right, but it wasn’t overly difficult to get to this situation, hence this fight not being red.
Ryland: The setup and sequence were a bit tricky to find. My set was Blizzard, Hail, Substitute (never had to use 4th move but it was Hex and could’ve come into play depending on the sequence) with Weakness Policy. Nidoqueen procced WP as I used Hail, which was necessary to destroy the harsh sandstorm. Then, I subbed and due to all the various damage I had been taking, barely got below half. On the Torterra, it used Arenite Wall first turn, and on the second turn, I froze it with Blizzard. Hail ran out on this turn, and it stayed frozen on this turn so I could set the hail back up. Having a sub up was necessary to survive a hit from Excadrill. From here I swept with Blizzard. In hindsight I probably should’ve kept attacking as that was the safer option. This could have played out a few ways but regardless I needed the right setup and amazing luck.
Isha was very easy (Blinding!), just listing it here because it marks the completion of the run.
Attempts with other Pokemon
SpoilerDufaux was not the first Pokemon I tried this with - I've been grinding this for a while. Here are my previous attempts:
Arceus: The first thing I tried was to see if any official Pokemon could do it, and Arceus seemed like the best choice because you can change its type to whatever you want using plates. However, as I mentioned, this quickly fell flat - Arceus is nowhere near good enough. Its main problem is that it's not strong enough - both Swords Dance and Calm Mind TMs are unavailable, so Arceus can't boost and doesn't have enough power to break through the harder fights. Arceus got destroyed so pathetically that I resorted to using the broken Rejuvenation-specific alternate forms, as this was the point I realized that almost certainly none of the official Pokemon can do it. Considering how I barely pulled it off with something as broken as Dufaux, I am pretty sure I'm right about this.
Kowapudunga: I tried using the behemoth that is the base 800 HP Wailord, and all of its other stats aside HP are boosted compared to a regular Wailord as well. Despite this thing having off-the-charts bulk, it could not reasonably get past the Rift Carnivine fight. I believe I mapped out a way to win, but it would require luck that has somewhere in the order of magnitude of 1/10000 chance to win. At that point, I just called the run off rather than suffer through that.
Rift Aelita (I got so close!)
SpoilerHere are Rift Aelita's characteristics:
- Type: Rock/Fighting
- Ability: Savagery (+1 Atk & SpA when health drops below every 20% threshold)
- Base Stats: 150 HP / 190 Atk / 105 Def / 105 SpA / 250 SpD / 200 Spe
Like Dufaux and Eternamax Eternatus, Rift Aelita is stupidly overpowered, largely in part to its ability. I got so close to completing the run, but like Kowapudunga, I ran into a fight near the very end which required unreasonable luck to win. For this run, I gave myself the ability to learn Rock Slide and Gunk Shot, as those were moves that Rift Aelita has in her actual fight, and as you can imagine, Rock Slide is what allowed the run to get as far as it did.
When I was jotting down notes, I noted every fight. The easy ones were a super brief couple-word note, but warning, the following is long. Bold fights were hard, and Bold red fights were excruciatingly hard. Unbolded fights were easy.
SpoilerChapter 1
Melia1, Zetta1, RiftGyara1, and Venam’s gym were free due to how high my stats are, and I have Rock Throw + Bulldoze for good coverage.
Chapter 2
Pulse Musharna was free due to me being able to Sub and give myself safe Savagery boosts. Nim1 wasn’t bad, just had to make sure to target the right Pokemon. Zetta2 was free and so was Rift Galvantula due to Bulldoze.
Keta1: Had to burn a Telluric Seed. For some reason, after the first turn, Breloom didn’t Mach Punch me. Then, Hariyama got a fortunate high roll, bringing me barely below 40% so I got +3 in Attack rather than +2. This extra boost allowed me to kill the Throh with Bulldoze.
Madelis1: Not too bad. Sub may have prompted Mewtwo to go after Keta’s Pokemon. Once the AI did that, it was easy to win.
Rift Volcanion was free. Keta2 wasn’t hard either.
Chapter 3
Amanda2 and RorimB1 were free. Marianette was also free with help from Sub.
Chapter 4
Aelita1 was free because Gligar’s Bulldoze doesn’t break my Sub.
Eli&Sharon1: As long as I didn’t miss Rock Slides, I was fine due to Sub, but this fight could’ve gone wrong pretty easily.
Geara1: Had to intentionally let myself get down to red health to get +4 Attack from Savagery, but that wasn’t hard to do with how much damage they were doing + Sub. Then, I had to not miss Rock Slides and either flinch or crit the Giratina.
Ren3: Had to have Sableye miss a 90% accurate Will-o-Wisp on the first turn. Then I had to not miss Rock Slide against Arcanine and Greninja.
Narcissa: Had to flinch or crit the Dusclops, and had to hit about 8 rock slides in a row.
Chapter 5
Pokegang: Had to get to low health to get sufficient boosts and not miss several Rock Slides.
Nim2: I got 4 rock slide flinches that all were necessary, and I didn’t miss ~10 Rock Slides to win on the first try. I forgot to give myself a second Pokemon which might have affected things but either way I think I would have had to get very lucky to win this fight.
Madelis2 was very easy, especially with the Cave boost, just had to not get unlucky. Neved was not hard either due to how broken Rock Slide is. For Melia2, had to put an Earth Plate on and get to a specific amount of health so I would be at +3 but not in range of Shadow Sneak, but this was easy all-around. Sam&Alex1 weren’t hard, just had to not get unlucky.
Valarie: Burned 3 Rare Candies so I could learn Stone Edge. Had to adjust EVs to 252 HP and Defense to live Floatzel’s hit. Had to crit or get a decent roll on Stone Edge vs Quilfish, then hit one Stone Edge and 4 Rock Slides after.
Chapter 6
Geara2: Had to remove Stone Edge for Sub. Got a Flinch with Rock Slide on Masquerain, which might have been required but that’s not hard to get. From there just used Sub appropriately and didn’t miss Rock Slides.
Rift Carnivine: Surprisingly, Rock Slide spam worked. I might have gotten one crit, but I think a flinch would have worked as well. Had to not get crit and had to make sure they attacked instead of statused.
Zetta3 was completely free. RorimB2 was easy because they couldn’t do much damage to me and I just had to not miss a couple times. Ren4 was an easy sweep after I let the Cacturne hit me to get boosts.
Crawli: Needed 72 Attack EVs to KO the Scizor with +2 Rock Slide, then maxed out Defense due to Scizor having Telluric Seed. Also, set my health going into the fight such that I would, by 1 HP, get a +2 boost (as opposed to a +1 boost) after using Substitute, but still be at enough health to barely live Scizor’s +1 Bullet Punch. After that, it was just about not getting crit or missing.
Chapter 7
Sharpedo Gang: Had to flinch twice and hit 6 Rock Slides, slightly less than a 5% chance
Sam&Alex2: Had to flinch Machamp and not get bad rolls on their priority attacks, or miss of course.
Venam&Saki: Actually not bad. Meganium helped and once I got to +2 I was able to mow through their teams and even get a sub up. Might have gotten slightly lucky though.
Madelix&Bartz: Not too bad, just had to not get unfortunate after a while.
It feels weird not to be bolding a historically tough gym leader, but Angie was free because I’m Jolly – I won on the first try and I even missed a Rock Slide vs Rotom.
Chapter 8
Aelita2 was easy, and so were the Kingdra Statues. Groudon was free due to Sub/Poison stalling. Kyogre was too with the same method. Giratina wasn’t bad, just had to get one flinch.
G/Z: It didn’t take me an absurd number of attempts, but I think I got really lucky on my successful attempt in terms of AI stupidity. They kept targeting Melia, and this was the only attempt where on Turn 1, Zetta spent the turn using Silvally Crest. I had to hit Zap Cannon on Gyarados. Maybe I got one Rock Slide flinch? And I don’t think I missed Rock Slide. Overall, the AI switched once when they didn’t need to, kept targeting Melia when they could’ve hit me, and could’ve sent out their Pokemon in a better order.
Amber: Not bad. Had to not miss too many Zap Cannons vs Chandelure. Once I got to low HP I swept with Fist Plate Brick Break.
Chapter 9
Rift Garbodor wasn’t bad due to Sub and Bulldoze, and Drain Punch not breaking my Sub.
Amanda3: Taught Return so I could target the not-Torkoal, as keeping Torkoal alive helped me due to how little damage it was doing to me. After coming up with this strategy, just had to flinch one Rock Slide.
Erick: Had to have pre-set Sleep going into the battle so I wouldn’t get paralyzed by Raichu’s Thunder Pulse. Had to either flinch Magnezone or have it miss with Thunder Pulse. Ampharos set up Electric Terrain, and I was able to Sub-stall Tailwind because amazingly, Electric Terrain-boosted Thunder Pulse didn’t break my sub.
Chapter 10
Spelunker bot was easy but then again it kept targeting my ally with attacks.
Flora: Had to have 12 Speed EVs to outspeed Ludicolo in rain, and had to hold a Chesto Berry. Had to get a max roll, flinch, or crit on Whimsicott, then had to crit/flinch Mega Venusaur or, what happened in my win was the Shiinotic kept clicking Strength Sap against my Sub, so I was able to have a Sub up against the Mega Venusaur allowing me not to have to crit/flinch it.
Chapter 11
Venam3: Had to not have Cursed Body proc. Otherwise just had to not get the usual bad luck – taught Return for the fight just so I could take out troublesome Venusaur.
Zetta5 was pretty free.
Puppetmasters: Had to nearly max out my Speed to outspeed Telepathy Gardevoir. This fight wasn’t bad. Just kind of had to get a decent sequence going, like avoiding Metagross + Bronzong out simultaneously, having them not attack me too much, etc. Wasn’t really a formula, just had to have the battle play out decently.
Chapter 12
Vivian was completely free, made even easier by getting a free Sub vs Ttar. Valarie2 was also free – it helped that Toxicroak kept going for Sucker Punch even though it had a Sash. And so was Kenneth, with the usual “Sub while they use a status move” thing on Roserade.
Again, it feels weird to not be bolding a typically difficult fight, but Souta was free. Hawlucha’s Sky Attack almost never kills and instead brings me into +4 boost range, and I OHKO it and everything else with Return/Ice Punch. All I had to do was give it an Elemental Seed myself (and change to Adamant because I finally have access to the nature changer and I don’t need Jolly for now).
Code: Bella: How perfect that this fight happens to be an intense fight! Had to flinch the first Golem with Rock Slide so it couldn’t Superpower, bringing it in range of my Drain Punch. Florges used Protect which bought me enough time to kill Rift Aelita. And on one turn, one of the Psycho Boost Golems attacked Florges instead of me (when I was almost dead), allowing me to win.
Chapter 13
Huey was free but I had to burn a Magical Seed to reverse the Trick Room. Reina was free as long as I flinched the Ribombee and that’s all.
Angel of Death (Phase 1): Equipped a Chesto Berry and had Gunk Shot over Ice Punch. If I didn’t have Gunk Shot, this fight would require near-lottery odds to win. Allocated Speed EVs to outspeed Angelus by 1. Set HP going into the battle such that after a Sub, I would, by 1 HP, get a +2 Savagery Boost. Had to hit and poison Gunk Shot, and then on the next turn, had to flinch with Rock Slide, which comes out to a 6.5% chance. After that, it was a matter of subbing up one more time to get to a +4 boost and hitting all my Rock Slides. The Eviolite Ralts lives a +4 Rock Slide, but I flinched it. After getting the 6.5% luck, I didn’t have to get extremely lucky to win, but I had to not get slightly bad luck, as I could’ve missed Rock Slides, or Heal Block could’ve killed me after a few turns due to the field.
Angel of Death (Phase 2): She outspeeds me but targeted Ren with Lovely Kiss turn 1, so I was able to get a sub up. It didn’t matter because I had my Chesto Berry from the last phase, but only because I got lucky, but normally I don’t think I would have a Chesto Berry. Anyway, from there it was not bad as long as they kept targeting Ren, just had to not get terrible luck.
Ren5: Taught Fire Punch and gave Sitrus Berry. Kept Gunk Shot for Silvally-Fairy. Most of this was finding the setup and sequence to go through, but after that the actual fight wasn’t bad, just had to not miss a few moves.
Huey was free. After this, changed nature to Jolly for Ryland’s Excadrill, as I would be losing access to GDC after the next fight.
Adam: Not bad. Had to have either Gigalith or Terrakion miss Stone Edge, or flinch Terrakion. After that just had to not miss a few times.
Chapter 14
THE RUN ENDER (LORNA): I think the run is over because it appears you need unreasonable luck to win.
First of all, you have to go into the fight fully healed because in the cutscene, Audino heals you and then you immediately go into the fight. Therefore I can’t start the battle at a low amount of health to get a massive Savagery boost.
Here’s the closest I got:
She leads with Friend Guard/Sash/Sleep Powder Vivillon, and physically defensive Trick Room Screens Aromatisse. The Aromatisse always uses Trick Room on the first turn against me, and if that happens I auto-lose. So, on the first turn I have to Rock Slide flinch the Aromatisse, then use Gunk Shot on the next turn to KO it. This entire sequence thus far has around a 10% chance of happening because I need decent rolls to kill the Aromatisse.
Then, she sends out LunatoneSolrock fusion, and Vivillon is at 1 HP. She switches Vivillon out for Marowak. But, the LunatoneSolrock has Trick Room also, so I have to prevent that from using it as well. But since the Marowak is out and OHKOs me with Bonemerang, and Iron Head doesn’t 2HKO LunatoneSolrock, I need to have Marowak miss Bonemerang at least twice as I KO the LunatoneSolrock. Or instead of Iron Head, I could simultaneously flinch both of them down which is also stupidly unlikely. This sequence is even less likely, and combined with the earlier sequence, puts me at less than a 0.1% chance. And even if all of this happens, I still might have to get additional luck to win, as there’s a Psychic/Will-o-Wisp Crest Darmanitan and Psyshock Sylveon still in the back.
,,,,,,,,,,,,,,,,,,
Another possibility is using Ice Punch instead, and freezing the Aromatisse Turn 1. Then it has to stay frozen (or flinch if it defrosts) as I either freeze or flinch down the LunatoneSolrock. But Rock Slide is pretty much a 5HKO, so essentially, I need to freeze the LunatoneSolrock as well, and have both it and Aromatisse stay frozen as I take multiple turns to kill them. The rest of the fight probably won’t be as bad but I will almost certainly still need a little luck, and that’s not including the default Rock Slide misses. So, with this method, my chances of winning are also under 0.1% (as I need two first-try freezes with in itself is a 1% chance).
,,,,,,,,,,,,,,,,,,
Regirock also learns Zap Cannon and Dynamicpunch, but with those moves being 50% accurate, and there only being a 25% chance to full-para and a 33% chance to hit in confusion, this seems as unlikely or even less likely to work because I need them to not only hit multiple times, but also proc many times in a row.
Maybe there’s some other way, but it seems unlikely that there is. The run was so close to happening, only to trip up right before the finish line. And what’s even worse is that I am almost certain I can reasonably beat Adam, as Jolly outspeeds Sand Rush Excadrill. Oh well.
Rift Ferrothorn and Rift Gardevoir might also be able to do it, though I'm not sure. I've done more than enough of these runs and will allow someone else to try them if they'd like.
- Thank you to Moto for providing me with a modified Scripts file that caused Dufaux to not revert back to a regular Froslass after every battle, but to Form 1 instead! This happens because Dufaux (and others) are coded as Mega Evolutions. This saved me tons of headache and time.
- Thank you to Falirion for creating tons of resources such as the Intense Teams List, bouncing ideas off of, and also coming up with the clever strategy of going into the fight asleep so that I couldn't be statused on the first turn.
- And thanks to all the Rejuvenation devs! I wouldn't have done all of these attempts if I didn't enjoy the game so much. Overall, despite this being a gruesome endeavor, it was a lot of fun!
-
 11
11
-
I'm sure a decent number of people are aware of this, but it's very relevant to this thread. There are lots of little hints and nuggets over at Jan's Tumblr, where he answers fan-submitted questions. Just today, there were a couple responses from him that are quite topical:
Perhaps this question was even motivated by the "Is the Interceptor the MC or the human being behind the computer screen" discussion that happened recently in this thread.
A lot of people independently come to the conclusion that in the origin story that Nymiera tells you in her house, the Man and the Woman are Vitus and Nymiera, but this confirms it (the Woman part, at least) and adds a bit more flavor to Nymiera's character. (Also, it wasn't until I was replaying the game recently that I realized it was "Nymiera" and not "Nymeria".)
I know that Jan knows that his responses are being watched carefully. He needs to not spoil anything major in his answers, but in addition to this, he has had many oppotunities to answer questions in such a way that would cause people (see: the people posting in this thread, which is a group that I am now a member of) to spiral down the Theory Rabbit Hole as he sits back and laughs. If I were in Jan's position, I certainly would have been tempted to take some of those opportunities.
-
2
-
-
20 minutes ago, Edo said:
Really good guide, love it. Gives some pretty good tips one might not consider, like Power Trip on Empoleon which seems pretty broken.
Typhlosion also has a very interesting option with Nature Power, since the move it turns into can be either physical or special, so Typhlosion can always cover both.
By the way, you can teach egg moves with the second move relearner in Sheridan village, no need to breed. Thus it's really easy to get some of the sets.
Also, it's nice that you made the EV spreads so detailed and considered other mons (e.g. still outspeeding others), but Rejuv often exceeds the 252 limit, especially on Intense, so it might sometimes not work out.
Didn't realize that about the egg moves, thanks! That is fantastic and I'll edit all of the sets. And I think Nature Power is worth a mention. Good point about some opponents having illegal EV spreads, but unfortunately that's hard to account for.
-
23 minutes ago, AAAAAAAAAAA said:
It's nice to see a guide so that people have a better idea of what to run on crested mons, but I also have some suggestions for some of the crests that may be helpful
You could also run swords dance Ariados for even more power instead of sticky webs, surely ariados isn't that fast and against offensive it struggles to set swords dance but after one or 2 boosts with either screens or sleep support is definitely devastating, plus you always have the option to run tspikes or webs in another pokemon
Recover is an amazing move on crest beheeyem, since it pairs perfectly with the crest and helps you beat foes with super effective moves after you disabled that move, giving a lot of longevity to it, I personally used it over terrains since beheeyem can't hold an amplified stone and I don't like terrains but still recover is great on it and should definitely be considered
Deddene could run volt switch for people that play on set mode, I know they aren't the majority but its definitely an option
Empoleon has the bulk and typing to do a double dance set with sd and agility, probably running liquidation and power trip since steel stab isn't that useful
Oricorio definitely can use roost in their sets due to its passable bulk, specially electric and fire ones with their good typings
Hypno gets nasty plot which is definitely a viable setup option, signal beam could potentially take down dark types but most of them are fast physical attackers which hypno hates
Stantler gets sucker punch by RM, which can potentially be better than throat chop due to its average speed and most slower targets being put to sleep
This is all I had to help, I hope I wasn't being rude

Thanks for the reply!
- Yeah, Swords Dance is worth it if you have other Sticky Web support. If not, you need Sticky Web on Ariados because it's such a good move for your team overall.
- I completely agree with you that Recover is a fantastic move, but I have fewer recovery moves on these sets compared to competitive sets due to the fact that this in-game, and you can use potions. Same for Roost on Oricorio.
- Agree about Dedenne and Empoleon
- Nasty Plot was an oversight on Hypno, but what you said about Signal Beam is why I didn't include it. Sure, you hit them, but they often outspeed and KO you anyway.
- Didn't realize that the RM could teach transfer-only moves
- Ice Punch is weaker than Ice Fang on Feraligatr due to the Crest boost.
-
- Popular Post
- Popular Post
Crests are powerful items which provide large and unique buffs to certain Pokemon. Here are my recommended movesets for each crest Pokemon. Shoutouts to Falirion for compiling the Crest effect guide and all of the Rejuvenation devs for the great game! Check out the Item Location Guide to see where to get each Crest (you can't get them until near the end of V12). The intention of this is not to replace the Crest effect guide, but rather to explore the viability and uses of Crest Pokemon.
One thing to consider is the concept of opportunity cost. By holding a Crest, you cannot hold another item. Therefore, you should consider the benefits of a Crest not in a vacuum, but compared to another item you might want to hold. Also, we do have data on some Crests that are currently unobtainable by the player as of V12 (e.g. Silvally), but I will not be including those for now. This post can be updated as more Crests are released. Anyway, here are all of the Crests available for the player to use in Rejuvenation.
Ariados
SpoilerCrest Effect: Increases Ariados' Speed stat by 50%. If the opponent is Poisoned or slowed, Ariados' attack will always be a critical hit.
Rating: This is a pretty nice buff for Ariados. It's now a much better setter of Sticky Web and is able to take advantage of it very well if it has Sticky Web support from a teammate. With the speed boost from the Crest and the lowered speed from Sticky Web, Ariados will often move first, and its critical hits will do even more damage due to its Sniper ability. However, if the opponent isn't slowed by Sticky Web, such as if they're not grounded or on the turn Ariados is setting up the webs, Ariados is still not fast, and is frail overall.
Ariados @ Ariados Crest
Ability: Sniper
EVs: 252 Atk / 4 Def / 252 Spe
Jolly / Adamant Nature
- Poison Jab
- Megahorn
- Stomping Tantrum
- Sticky Web / Swords DanceIt might seem like Toxic Thread is a natural choice for this set given how the Crest works, but I don't think it's worth it. Once you set up Sticky Web, all grounded opponents that switch in will be slowed, without you needing to waste a turn. Stomping Tantrum is important because opposing Poison and Steel Pokemon resist both of its STAB moves. A Jolly nature is used because the most important thing is that Ariados is able to get up Sticky Web in the first place, and even with the Crest boost, Adamant Ariados is not that fast.
An Adamant Nature and Swords Dance should only be run if your team has another Sticky Web user. Toxic Spikes support is also helpful but not nearly as effective as Sticky Web due to Crest Ariados still not being that fast. But, with Sticky Web support, Swords Dance Crest Ariados becomes very threatening.
Bastiodon
SpoilerCrest Effect: When Bastiodon takes damage, it deals damage to the attacker equal to 50% of the damage Bastiodon took. Bastiodon also heals the amount of damage dealt this way.
Rating: This is a massive improvement to Bastiodon, allowing it to simultaneously heal and deal a good amount of damage. Rest + Sleep Talk fits this set well, but as of V12 there is no Rest TM. Until then, Bastiodon has a much harder time beating opposing Pokemon 1v1.
Bastiodon @ Bastiodon Crest
Ability: Sturdy
EVs: 252 HP / 4 Def / 252 SpD
Careful Nature
- Metal Burst
- Rock Slide (replace with Rest once Rest TM is available, or not if you're fine just using potions)
- Iron Defense / Taunt (replace with Sleep Talk once Rest TM is available, or not if you're fine just using potions)
- Roar / Stealth RockBastiodon still has terrible offensive stats, so Metal Burst is Bastiodon's best way of doing damage, alongside the damage from its Crest. Once the Rest TM becomes available, Rest allows Bastiodon to fully heal and regain its Sturdy; the healing from its Crest is good, but it's not enough for Bastiodon to stick around for as long as it needs to. Until then, there are a few utility moves it can use. Roar phases out opponents trying to set up and also accumulates potential hazard damage. I wouldn't recommend Taunt + Roar because they're slightly redundant, but if you have Stealth Rock, you can use Taunt to prevent setup and force them to attack you (which will do damage to themselves in the process due to the Crest), or if not, Iron Defense makes you extremely bulky on the physical side.
Beheeyem
SpoilerCrest Effect: If its opponent attacks first, the damage Beheeyem takes is reduced by 33%. It also disables the first move that hits Beheeyem (unless the opponent has a disabled move already).
Rating: This is an excellent improvement to Beheeyem's defensive capabilities. In addition to the obvious damage decrease, sometimes opposing Pokemon will only have one move to hit Beheeyem with well, and if that gets disabled, then Beheeyem could end up walling the rest.
Beheeyem @ Beheeyem Crest
Ability: Analytic
EVs: 208 HP / 252 SpA / 48 Spe
Modest Nature
- Psychic
- Signal Beam
- Calm Mind / Nasty Plot
- Psychic Terrain / Recover (if no potions)Signal Beam is the best coverage because it hits opposing Psychic and Dark Pokemon. Both Calm Mind and Nasty Plot are justifiable, as Crest Beheeyem's added bulk make the Special Defense boost from Calm Mind worth it in some scenarios. Psychic Terrain makes Psychic more powerful and doubles Calm Mind/Nasty Plot boosts, among other things. The Speed EVs are to outspeed everything up to uninvested base 45s, which there are plenty of. The Crest makes Beheeyem a lot better off if it moves last, but if you can outspeed something and take it out before you take damage yourself, then that's preferred. Recover is a fantastic move for Crest Beheeyem and should be used in situations where you cannot use items, but it's only listed as a secondary move because you can usually just use potions instead. Beheeyem does get Telepathy and thus gets double speed under Psychic Terrain, but then it's less bulky, doesn't get the Analytic power boost, and requires the terrain to be up in order for it to have any effect.
Castform
SpoilerCrest Effect: Castform automatically uses its first weather move upon switch-in. Its weather forms have the following stats and additional abilities:
Rain: 100 HP / 70 Atk / 80 Def / 70 SpA / 80 SpD / 70 Spe & Rain Dish
Sun: 70 HP / 70 Atk / 70 Def / 90 SpA / 70 SpD / 100 Spe & Solar Power
Hail: 70 HP / 70 Atk / 70 Def / 100 SpA / 70 SpD / 90 Spe & Slush RushCastform also sets up Sandstorm on switch-in if Sandstorm is the first move, but Castform doesn't have a Sandstorm form.
Rating: This is one of the biggest buffs of any Crest. Castform is still not the most incredible Pokemon, even with the Crest, but in addition to getting better stats and a beneficial ability for the weather it automatically sets up, Castform can act as a secondary weather setter, as it essentially acts as Drizzle/Drought/Snow Warning/Sand Stream.
The Sandstorm set is not recommended because Castform doesn't have a Sandstorm form. Here is a set for each of the other forms. The Rain form is the least viable I'd say, but it's still solid and it can definitely be the right choice depending on what your team is. The Hail form is the fastest, but the Sun form is the strongest, at the cost of taking Solar Power damage. However, I think the one you should use is the one which complements the rest of your team best, because none of these forms are really bad.
Castform @ Castform Crest
Ability: Forecast
EVs: 252 HP / 252 SpA / 4 Spe
Modest Nature
- Rain Dance
- Weather Ball
- Hurricane
- ThunderWater is a good defensive typing and the Crest makes Rain-Castform bulkier but not faster, so a tank set is used. Hurricane won't miss in the rain and provides coverage against Grass types. There's no Ice Beam TM in V12. Once we get that, replace Hurricane with it for additional coverage against Dragon types. Thunder won't miss in the rain either and provides coverage against Water types. Hydro Pump is an option over Weather Ball, but it has less PP and accuracy.
Castform @ Castform Crest
Ability: Forecast
EVs: 4 HP / 252 SpA / 252 Spe
Timid Nature
- Sunny Day
- Weather Ball
- Solar Beam
- ThunderboltThe Crest makes Sun-Castform faster and stronger. A Timid nature is preferred to outspeed as much as possible, Weather Ball is your strong, reliable STAB attack, Solar Beam has no charge turn in the sun, and it and Thunderbolt give you coverage versus all Water types. First Blast is an option over Weather Ball, but it has less PP and accuracy.
Castform @ Castform Crest
Ability: Forecast
EVs: 4 HP / 252 SpA / 252 Spe
Modest Nature
- Hail
- Blizzard
- Flamethrower
- ThunderboltA Modest nature is used because with the doubled speed from Slush Rush and the speed buff from the Crest, Castform will be faster than pretty much everything anyway. Under hail, Blizzard is 100% accurate, stronger than Weather Ball, targets both opponents in doubles, and has a chance to freeze. Flamethrower and Thunderbolt hit opposing Water, Steel, and Ice types that resist Blizzard.
Cherrim
SpoilerCrest Effect: Flower Gift is always active, regardless of the weather (Cherrim and its allies receive a 50% boost to Attack and Special Defense).
Rating: Unfortunately, this is one of the least beneficial Crests for singles battles. Always having boosted Attack and Special Defense is nice, but Cherrim's Attack stat is terrible and the Swords Dance TM isn't available in V12. The Attack buff from Flower Gift is a good buff in doubles battles, but even with the Crest, Cherrim isn't great. If you like Cherrim then absolutely go for it! But if you're just looking for a Grass type that's excellent in battle, then there are many better options.
Cherrim @ Cherrim Crest
Ability: Flower Gift
EVs: 4 HP / 252 Atk / 252 Spe
Jolly Nature
- Petal Blizzard
- Return
- Leech Seed (replace with Swords Dance once TM is available)
- Grassy TerrainIf you want to use Crest Cherrim, this is what it should use for singles battles. You don't need to necessarily run a Sunny Day set because Flower Gift is always active, though I suppose you could if you wanted (it would just make the Crest nearly useless to the point where you would probably just want to run another item). The Crest makes Cherrim do more damage on the physical side. Return is kind of the only physical coverage it gets.
Cherrim @ Cherrim Crest
Ability: Flower Gift
EVs: 252 HP / 252 Def / 4 SpD
Bold Nature
- Helping Hand
- Leech Seed
- Giga Drain
- Grassy Terrain / Healing Wish / Worry Seed / Heal Pulse / SynthesisThis set attempts to make Cherrim useful in a doubles-specific setting. The motivation for such a set would be to give Cherrim's ally the 50% Attack and Special Defense boost (mainly Attack though). Cherrim has very poor damage output on its own, and therefore a fully supportive set is used. Petal Blizzard is not used here because it hits your ally in doubles. Helping Hand is usually the main move, boosting a partner's move even further, such as Rock Slide. There are many moves slashed in the final slot but that's because they're all niche; which one you should use depends on your partner, and whether you're going to use potions or not (in which case Healing Wish, Synthesis, and Heal Pulse are not really useful). This set only works in very few and very specific situations, namely if you have a strong partner spamming a physical attack that hits both targets (again, Rock Slide). Because of how limited this set is, I would not recommend you use it, but it is one of the best things Crest Cherrim can do, so it's listed.
Claydol
SpoilerCrest Effect: When Claydol uses a special attack, Claydol's Defense stat instead of its Special Attack stat is used in the damage calculation. "Beam" moves are boosted in power by 50%. "Beam" moves do not have a charge-up or recharge turn.
Rating: This is a fantastic Crest. Not only does Claydol's damage output increase by a ridiculous amount, but you can simultaneously increase your physical bulk and damage output due to it using Claydol's Defense stat in the damage calculation. This also means that effectively, Cosmic Power boosts Claydol's Defense, Special Defense, and Special Attack. Ice Beam is not yet available in V12.
Claydol @ Claydol Crest
Ability: Levitate
EVs: 252 HP / 252 Def / 4 Spe
Bold Nature
- Hyper Beam
- Solar Beam
- Earth Power
- Cosmic PowerMaximum Defense investment is used to simultaneously make Claydol as bulky and powerful as possible. Some EVs can be taken from HP and put into Speed if desired. Hyper Beam doesn't have a recharge turn and Solar Beam doesn't have a charge turn with the Crest. Hyper Beam is a nuke that is used against anything you don't have super-effective coverage against. Solar Beam is the next strongest attack and provides good coverage while being perfectly accurate. As stated above, due to the mechanics of the crest, Cosmic Power provides a massive buff to Claydol. Earth Power is not a "Beam" move and thus is not boosted, but all of Claydol's "Beam" moves (except Charge Beam but that's really weak) are resisted by Steel, so Earth Power is by far your strongest move against Steel Types, especially because Claydol gets STAB on it.
Cofagrigus
SpoilerCrest Effect: Increases Cofagrigus's Special Attack and Special Defense stats by 25%.
Rating: This is a solid buff, patching up Cofagrigus' lower Special Defense and making it fairly strong. Cofagrigus' best set isn't available to it because the Trick Room TM isn't available yet, so it'll have to do as a tank for now.
Cofagrigus @ Cofagrigus Crest
Ability: Mummy
EVs: 252 HP / 252 SpA / 4 SpD
Modest Nature (Quiet when Trick Room TM is available)
- Shadow Ball
- Energy Ball
- Psychic (Replace with Trick Room once TM is available)
- Nasty PlotIf you manage to get the IVs for Hidden Power Fighting, that is the best coverage. Otherwise, Energy Ball and Psychic is what it has. Cofagrigus functions best as a Trick Room sweeper, but the Trick Room TM isn't available yet.
Darmanitan
SpoilerCrest Effect: Forces Darmanitan to stay in Zen mode. Only works if its ability is Zen Mode.
Rating: To be brutally honest, this is a very poor Crest. Crest Darmanitan is, in my opinion, worse than the regular, standard Darmanitan. In its defense, Darmanitan-Zen is quite bulky, has a secondary Psychic STAB to attack with, and has some nice resistances, but it is slow. If you really like Darmanitan-Zen, then this Crest allows you to always utilize that form, but regular Darmanitan is a better Pokemon. This is because Crest Darmanitan is essentially a Darmanitan-Zen that has no ability and no item, compared to regular Darmanitan which has Sheer Force and Life Orb, which, while more frail, is much faster and almost 70% stronger.
Darmanitan @ Darmanitan Crest
Ability: Zen Mode
EVs: 128 HP / 252 SpA / 128 Spe
Modest Nature
- Psychic
- Flamethrower
- Grass Knot
- Overheat / Work up (could replace with Focus Blast once TM is available)If you insist on using Crest Darmanitan, here is the set. Overheat provides you with a nuke that can pick up on some OHKOs that Flamethrower can't. Alternatively, Work Up can boost its power, though Darmanitan-Zen's slow speed makes it less effective. Focus Blast is more great coverage, but the TM isn't available yet. Flame Charge might seem appealing to patch up the low speed, but it'll do next to no damage due to Darmanitan-Zen's atrocious Attack stat, and it's still outsped by the faster offensive Pokemon even after a boost. 128 Speed EVs allow Darmanitan to outspeed uninvested base 70s, and thus most defensive Pokemon. Again though, overall Crest Darmanitan is worse than regular Darmanitan.
Dedenne
SpoilerCrest Effect: When Dedenne uses a physical attack, its Speed stat is used rather than its Attack stat in the damage calculation.
Rating: This crest allows Dedenne to hit a decent amount harder, and allows it to have alright (as opposed to terrible) bulk. It's still not the greatest Pokemon even with the Crest, but having rare access to Nuzzle is a plus.
Dedenne @ Dedenne Crest
Ability: Plus
EVs: 252 HP / 4 Def / 252 Spe
Timid Nature
- Wild Charge
- Play Rough
- Nuzzle
- Dig / Volt Switch (could replace with U-turn once TM is available)Due to the Crest, all it needs is speed investment to hit hard, so the rest can go into bulk. Wild Charge is your strongest Electric attack, but Thunder Punch can be used instead if you don't like the recoil. Dig is kind of shaky due to it being a 2-turn move, but could work due to the fact that the AI is much less intelligent than opposing humans. Volt Switch, while very weak, allows Dedenne to pivot out of unfavorable situations. Once the U-Turn TM is released, that is preferred because Volt Switch is very weak due to no Special Attack investment, and U-turn allows Dedenne to pivot out even versus Electric immunities.
Dusknoir
SpoilerCrest Effect: Increases Dusknoir's Attack stat by 20% and boosts Dusknoir's weaker moves (like Technician does).
Rating: Both of these boosts allow Dusknoir to have an extremely strong priority attack in Shadow Sneak. Overall, this benefits Dusknoir a good amount because it has a lot of great coverage moves, many of which are boosted by the Technician-esque effect.
Dusknoir @ Dusknoir Crest
Ability: Pressure
EVs: 252 HP / 252 Atk / 4 SpD
Adamant Nature
- Shadow Sneak
- Brick Break
- Rock Tomb / Ice Punch / Thunder Punch
- Bulldoze / Fire Punch / Shadow PunchShadow Sneak is mandatory because Dusknoir is so slow, and Brick Break provides the best coverage. Dusknoir has a ton of options from here and can be catered to what your team needs most. Rock Tomb and Bulldoze are both boosted by the Crest (due to them being 60 power), and them lowering your opponent's speed is a nice bonus. Dusknoir also learns the 3 elemental punches, which aren't boosted by "Technician", but are good coverage nonetheless. If more coverage isn't needed, Shadow Punch is Dusknoir's strongest STAB attack, and it hits hard due to being boosted by the Crest. Once the Earthquake TM becomes available, that is an option as well.
Empoleon
SpoilerCrest Effect: Stat changes are doubled.
Rating: After a boost, Crest Empoleon can be very threatening. Taking the Crest into account, both Defiant and Swords Dance boost Empoleon's mediocre Attack by 4 stages. At this point, Empoleon will have higher attack than an Adamant Mega Salamence after 2 Dragon Dances. Coupled with STAB priority in Aqua Jet, this boost could allow Empoleon to sweep weakened teams. Alternatively, Empoleon can run a specially-based Agility set to also sweep.
Empoleon @ Empoleon Crest
Ability: Defiant
EVs: 252 HP / 252 Atk / 4 SpD
Adamant Nature
- Swords Dance
- Aqua Jet
- Drill Peck
- Power TripDrill Peck provides coverage versus Grass types which resist Aqua Jet. After one boost, Power Trip will increase all the way to 100 power. Other options include Brick Break and Liquidation. Earthquake is also a fantastic move, but the TM isn't available yet. Empoleon isn't very fast and Aqua Jet has priority anyway, so investment is put into bulk due increase Empoleon's already good bulk - Empoleon also has a great defensive typing.
Empoleon @ Empoleon Crest
Ability: Defiant
EVs: 72 HP / 252 Atk / 184 SpeAdamant Nature
- Swords Dance
- Liquidation
- Power Trip- Agility
184 Speed EVs allow Empoleon, after an Agility, to outspeed Jolly Excadrill in Sand. Power Trip becomes 100 Power after using either Swords Dance or Agility, and becomes 180 Power after using the other one. After one boost, this set is less potent than the other two sets, but with both boosts it reaches a much higher ceiling.
Empoleon @ Empoleon Crest
Ability: Torrent
EVs: 72 HP / 252 SpA / 184 Spe
Modest Nature
- Surf / Hydro Pump
- Blizzard (replace with Ice Beam once the TM is available)
- Grass Knot
- AgilityThis set has gives Empoleon the best coverage and only requires one turn of setup. Overall, I would say that the other sets are better than this one, but this is definitely a viable set. 184 Speed EVs allow Empoleon, after an Agility, to outspeed Jolly Excadrill in Sand. As usual, Ice and Grass coverage hit opposing Grass, Dragon, and Water types which resist your Water STAB. This is a special set, so Defiant is useless - Torrent is used instead.
Fearow
SpoilerCrest Effect: If the opponent is below 75% health, Fearow's attack will always be a critical hit.
Rating: With Fearow's Sniper ability giving critical hits a 2.25x boost (rather than a 1.5x boost), if the target is under 75% health, Fearow has a pretty good shot of knocking it out. Combined with Fearow's solid Speed stat, and Fearow is quite potent, but only under this circumstance. Fearow isn't that strong if the opponent is at high health. Crest Fearow is relatively inconsistent because it's not good unless you can get yourself into that situation, which is not always easy due to how frail Fearow is. Hazard support is essential.
Fearow @ Fearow Crest
Ability: Sniper
EVs: 252 Atk / 4 Def / 252 Spe
Jolly Nature
- Return
- Drill Peck
- Drill Run
- Quick AttackThe first 3 moves are mandatory and self-explanatory. Thank goodness it gets Drill Run to hit Rock and Steel types. Quick Attack is extremely strong priority considering the Sniper-boosted critical hit and STAB. Fearow's terrible bulk makes it kind of a "kill or be killed" Pokemon, and so even though you have Quick Attack, a Jolly nature is used to outspeed as much as possible.
Feraligatr
SpoilerCrest Effect: Feraligatr's first attack after switching in has priority. Biting moves are boosted in power by 20%.
Rating: This Crest is an interesting tradeoff. Because Feraligatr has Sheer Force, which negates Life Orb recoil, Crest Feraligatr is actually weaker all-around than Life Orb Feraligatr is. In exchange, the benefit is that the first move Feraligatr uses is priority. This turns its Liquidation (or its other moves) into ridiculously strong priority moves which can bail you out of situations. Personally, I might value this one-time priority as slightly more than the higher overall damage output given by Life Orb, but you could argue either way. Also, using the Crest here allows one of your other Pokemon to benefit from having the Life Orb, because you only get one in the game. Whether you should use the Crest or Life Orb depends on your team, your preference, and even the battle. And of course, whether you've already put your Life Orb on another one of your Pokemon.
Feraligatr @ Feraligatr Crest
Ability: Sheer Force
EVs: 4 HP / 252 Atk / 252 Spe
Adamant Nature
- Liquidation
- Ice Fang
- Crunch- Dragon Dance
An Adamant nature is used to boost the power of the first move, which will be priority. Ice Fang and Crunch provide good coverage and are both boosted by the Crest. Dragon Dance is necessary to drastically improve Feraligatr's offensive potential. The Swords Dance TM is not available yet, but Dragon Dance would still be preferred due to Feraligatr's mediocre speed.
Glaceon
SpoilerCrest Effect: Instead of being weak to Rock and Fighting attacks, Glaceon resists them instead. Glaceon loses 1/16 of its health when switching into Stealth Rock instead of 1/4.
Rating: This Crest changes Glaceon's defensive typing from terrible to decent, as it's now weak to Fire and Steel but resists Ice, Rock, and Fighting. This does help, especially considering Glaceon's bulk isn't bad, but Glaceon still suffers from poor speed. And, Glaceon's best move, Ice Beam, is unavailable as of V12.
Glaceon @ Glaceon Crest
Ability: Snow Cloak
EVs: 4 Def / 252 SpA / 252 Spe
Modest Nature
- Frost Breath (change to Ice Beam once the TM is available)
- Shadow Ball
- Blizzard / Hidden Power (if you get one that hits Water, Ice, Fire, or Steel types super-effectively)- Yawn / Mirror Coat / Hail
As of now, Frost Breath is Glaceon's most reliable STAB attack. Blizzard is slashed later if you need more power, you're in a double battle, or if it's hailing. If you manage to get a Hidden Power that hits a type that resists Ice super-effectively, then that could be useful. Although Yawn takes 2 turns, Sleep is an incredible status, so you can either force a switch or allow Glaceon or a teammate to take advantage of a sleeping foe. Glaceon also gets Mirror Coat, but due to Glaceon's low HP, you'd need to move the Speed EVs into HP for it to be really worth it, leaving you with the problem of Glaceon being outsped by a lot more things.
Hypno
SpoilerCrest Effect: Increases Hypno's Special Attack stat and Accuracy by 50%.
Rating: This is quite a nice buff for Hypno. Hypnosis goes from an abysmal accuracy of 60% to a respectable 90%. Hypno's base Special Attack stat is not good, but the large boost from the Crest, allows Hypno to hit pretty hard. Psychic isn't the greatest typing, but Hypno is very bulky on the special side.
Hypno @ Hypno Crest
Ability: Insomnia
EVs: 4 Def / 252 SpA / 252 Spe
Modest Nature
- Psychic
- Shadow Ball
- Nasty Plot / Focus Blast (once TM is available)
- HypnosisDream Eater might seem appealing, but Hypno is slow and you're not always going to be in a situation where you can put the opponent to sleep, so I prefer Psychic due to its reliability. A 90% accurate Sleep-inducing move is incredible due to how powerful Sleep is. Shadow Ball hits opposing Psychic types. Nasty Plot boosts Hypno's power to insane levels and can be used more freely when the opponent is asleep. Alternatively, Focus Blast (which isn't available yet), is 100% accurate due to the Crest and provides great coverage. The Speed investment is to ensure that Hypno outspeeds pretty much every defensive Pokemon, allowing it to put them to sleep before they can move. Hypno also learns Dynamic Punch and Zap Cannon, but both are still only 75% accurate even after the Crest boost.
Infernape
SpoilerCrest Effect: Swaps Infernape's Defense and Attack stats with each other. Also swaps Infernape's Special Attack and Special Defense stats with each other.
Rating: Like with Darmanitan, unfortunately I'm going to say that this Crest actually makes Infernape worse. Usually, Infernape is fast and strong, but frail. Crest Infernape becomes fast and kind of bulky, but weak. In its defense, Infernape does learn some good support and utility moves, and Fire/Fighting has several useful resistances. You can make Crest Infernape work, but overall the offensive potential provided by regular Infernape is almost always more valuable.
Infernape @ Infernape Crest
Ability: (It doesn't matter. Both abilities do nothing on this set)
EVs: 252 HP / 4 Def / 252 Spe
Jolly Nature
- Close Combat
- Will-O-Wisp
- Encore
- Endeavor / Taunt / Slack Off (if no potions)Even with its higher offenses becoming its defenses, Infernape's mediocre-at-best HP doesn't make it as bulky as you might think. With its wide variety of utility moves, this is why I think it's better to invest in Speed than fully into Defense. Even without Attack investment and with Crest Infernape's lower Attack, if it's super-effective then Close Combat will still do a solid amount of damage and allows Infernape to actually do direct damage. Burning opponents with Will-o-Wisp is very valuable. A fast Encore allows you to take advantage of an opponent that's locked into a move. It gets Slack Off by pre-evolution only, but for in-game it's not necessary because you can just use potions. Endeavor is Crest Infernape's best way of dealing damage if it has low health. Taunt is another utility move it gets.
Leafeon
SpoilerCrest Effect: Instead of being weak to Fire and Flying attacks, Leafeon resists them instead.
Rating: Leafeon now has a good defensive typing. It resists Water, Ground, Electric, Grass, Fire, and Flying, while being weak to Bug, Ice, and Poison. All Leafeon have solid Speed and Attack stats along with its ability to boost in Swords Dance, but now with the Crest making it harder to take down, Leafeon can act as an offensive threat that also has quite a bit of defensive utility. However, Grass is not a great offensive type as always due to how many types resist it.
Leafeon @ Leafeon Crest
Ability: Chlorophyll
EVs: 252 Atk / 4 Def / 252 Spe
Jolly Nature
- Swords Dance
- Leaf Blade
- X-Scissor
- Knock OffJolly is preferred because Leafeon's Speed is solid, but not amazing, so it needs to outspeed as much as it can. It doesn't have many coverage moves but it has just enough to get by. It needs X-Scissor to get past other Grass types, but Grass and Bug do not provide great offensive coverage, with Knock Off only hitting most things that wall it neutrally.
Ledian
SpoilerCrest Effect: Punching moves hit 4 times. If these moves have secondary effects, they only activate on the first 2 hits.
Rating: This is probably the biggest buff of any item in the entire game, turning Ledian from a meme into a legitimate offensive powerhouse. Adamant Ledian, when considering that all of its attacks hit 4 times and are boosted by Iron Fist, effectively has 892 Attack. For comparison, after a Swords Dance, Adamant Arceus effectively has 744 Attack. Ledian has less power than the previous sentence would lead you to believe due to none of its attacks getting STAB and its attacks having lower power, but nonetheless with its great coverage, ability to do damage while boosting quickly, and potential for both priority and healing along with a high damage output, Ledian is legitimately powerful. It still has a horrible typing and physical bulk though, so there are quite a few Pokemon it can't even survive one attack from.
Ledian @ Ledian Crest
Ability: Iron Fist
EVs: 252 Atk / 4 Def / 252 Spe
Adamant Nature
- Power-Up Punch
- Ice Punch
- Thunder Punch- Mach Punch
Power-Up Punch boosts Ledian's Attack by 2 stages and deals solid damage due to the Crest and due to the later hits being boosted by the earlier ones. Ice and Thunder Punch provide impeccable coverage, with Mach Punch serving as important priority to clean up teams, especially at +2 Attack. Due to Ledian's physical frailty, poor defensive typing, and only average Speed, a Jolly nature is completely justifiable because you're not always going to be able to set up with Power-Up Punch or hit your target well with Mach Punch. Drain Punch could be put over either Thunder Punch or Ice Punch, but the loss of coverage is usually not worth it, and the priority of Mach Punch or the boosting ability of Power-Up Punch are not worth giving up.
Magcargo
SpoilerCrest Effect: Swaps Magcargo's Defense and Speed stats (as in, when calculating turn order, uses Magcargo's Defense stat. When Magcargo is hit by a physical attack, Magcargo's Speed stat is used in the damage calculation). Additionally, increases Magcargo's Special Attack stat by 10%.
Rating: Although the Crest makes it so it's no longer outsped by nearly everything and makes it a little stronger, Magcargo still suffers from its poor defensive typing, and as a result of the Crest, now suffers from awful bulk. Shell Smash is not recommended because due to the mechanics of the Crest, Shell Smash lowers Crest Magcargo's Speed by 1 stage.
Magcargo @ Magcargo Crest
Ability: Flame Body
EVs: 4 HP / 252 Def / 252 SpA
Bold Nature
- Flamethrower / Fire Blast
- Ancient Power
- Nature Power
- Earth Power / Hidden Power GrassThis setup makes Crest Magcargo the same speed as Dugtrio, which is quite fast. Because Magcargo can't really take hits, this is a simple all-out offensive route. Fire Blast is less consistent but justifiable because even with the Crest boost, Magcargo still isn't all too powerful. Due to how often you're battling on a Terrain in Rejuvenation, Nature Power is used, and the move that Nature Power is used on is often buffed by the Terrain as well. If you manage to get the IVs for Hidden Power Grass, then use that because Grass is by far Magcargo's most needed coverage, but if not then Earth Power is the best remaining coverage option. Weak Armor is not used because it actually lowers Magcargo's Speed.
Meganium
SpoilerCrest Effect: Reduces damage Meganium and its ally takes by 20%. Meganium and its ally heal 1/16 of their health after every turn.
Rating: Meganium typically holds Leftovers, so this Crest is a 20% bulk increase on top of that, along with it giving the same bonuses to its ally in double battles. This definitely helps it do its job of being a defensive cleric/supporter better as it's now quite bulky, though it's still pretty passive and not going to be doing much damage. But sometimes all your team needs is a bulky Grass type that can handle opposing problematic Water and Ground types, and this usually do the trick.
Meganium @ Meganium Crest
Ability: Overgrow
EVs: 252 HP / 4 Def / 252 SpD
Calm Nature
- Giga Drain
- Synthesis / Poison Powder
- Leech Seed / Reflect- Aromatherapy / Light Screen
Meganium is a defensive Pokemon, which is why Giga Drain is chosen over other attacking options. Even though it has Giga Drain plus the Crest recovery, those two combined still aren't much healing, so Synthesis is necessary. If you're fine using potions, then replace Synthesis with one of the slashed options. Leech Seed allows for further needed recovery, plus some damage. Aromatherapy is a good utility move for the team but again, if you think that healing items will suffice and it isn't needed, it can be replaced for screens.
Oricorio
SpoilerCrest Effect: Increases Oricorio's Special Attack and Speed stats by 25%.
Rating: Oricorio has base 93 Speed, but with the Crest, now it outspeeds everything up to and including Pokemon with base 128 Speed. Oricorio's Special Attack is higher than it's Speed and receives the same boost, turning Oricorio into a fairly potent threat with the ability to change its typing. However, its movepool is fairly shallow as always.
Oricorio can be a Fire, Psychic, Electric, or Ghost type. Which one you should use will depend on your team and what it needs, and even the battle.
Oricorio @ Oricorio Crest
Ability: Dancer
EVs: 4 Def / 252 SpA / 252 Spe
Timid Nature
- Revelation Dance
- Air Slash
- Hurricane / Taunt
- Work Up / Taunt (replace with Calm Mind once TM is available)Hurricane is significantly stronger than Air Slash but is inaccurate. You can keep it on as a secondary option for when Air Slash won't net the KO, or you would with Taunt and Work Up. The TM for Calm Mind is not available as of V12. Roost is not listed because you can usually just use potions instead.
Rampardos
SpoilerCrest Effect: Once per battle, Rampardos survives at 1 HP regardless of its HP before taking damage.
Rating: Rampardos has an enormous Attack stat, but what typically holds it back is that it's not that fast or bulky, along with Rock being a poor defensive typing, meaning it can often be taken out before it can dish out damage. This is no longer as much of an issue because Rampardos is pretty much guaranteed to survive at least one attack. This is a great buff because Rampardos will almost always be able to get at least one hit off which will do massive damage, often OHKOing. Head Smash is still slightly inaccurate though, and Rampardos' usual issues mean it's still hard for it to take out multiple Pokemon - the Crest just makes it much more likey it will take out at least one.
Rampardos @ Rampardos Crest
Ability: Sheer Force
EVs: 252 Atk / 4 Def / 252 Spe
Adamant Nature
- Head Smash
- Zen Headbutt
- Fire Punch
- Stomping TantrumHead Smash, while slightly inaccurate, is by far Rampardos' strongest attack. The remaining 3 moves each hit many different Pokemon super-effectively that resist Head Smash, and Zen Headbutt and Fire Punch are boosted by Sheer Force. For example, Zen Headbutt hits most Fighting types, Fire Punch hits most Steel types, and Stomping Tantrum hits several Pokemon that resist Head Smash that neither Zen Headbutt nor Fire Punch hit super-effectively, such as Aggron, Golem, and Empoleon.
Relicanth
SpoilerCrest Effect: Increases Relicanth's Attack stat by 20% and its Special Defense stat by 30%.
Rating: Another solid buff. Relicanth already has great physical bulk and now it has good special bulk as well. That, coupled with changing its Attack from mediocre to good and it having a recoil-free Head Smash, makes Relicanth a much more viable Pokemon. Allowing it to survive any attack with Sturdy or the potential to patch up its poor speed with Swift Swim might seem appealing, but the main draw will always be Rock Head Head Smash.
Relicanth @ Relicanth Crest
Ability: Rock Head
EVs: 252 Atk / 4 Def / 252 Spe
Adamant Nature
- Head Smash
- Waterfall
- Rock Tomb
- Zen Headbutt / Stomping Tantrum (replace with Earthquake once TM is available)Even though Relicanth now has better bulk, Speed investment ensure it will outspeed as much as it can. There will be situations where Relicanth is slower than its opponent but faster if its opponent is at -1 Speed. In situations like these, Rock Tomb is useful for a lot of free damage due to the turn order being reversed. It also provides a more accurate Rock move if Rock Tomb will get the KO anyway. Both Zen Headbutt and Stomping Tantrum provide very niche coverage.
Seviper
SpoilerCrest Effect: Increases Seviper's Speed stat by 50%. Damage is increased the higher % of HP the opponent is at (if the opponent is at 100% HP, Seviper receives a 50% damage boost).
Rating: This is what Seviper needed. It has great coverage, but was always too slow and not quite strong enough. Now with a Speed-boosting nature, Crest Seviper outspeeds Pokemon such as Dugtrio and Alakazam. Unfortunately, the Earthquake TM is unavailable as of V12, and Seviper really needs that coverage versus Rock and Steel types. However, it can still run a physical set, in addition to its usual specially-based set.
Seviper @ Seviper Crest
Ability: Infiltrator / Shed Skin
EVs: 4 Def / 252 SpA / 252 Spe
Timid / Naive Nature
- Sludge Wave / Sludge Bomb
- Giga Drain
- Flamethrower
- Glare / Sucker PunchBecause Crest Seviper is strong and frail, and thus is meant to do as much damage as possible, the extra 5 power that Sludge Wave provides is likely worth giving up the higher chance to poison. Giga Drain and Flamethrower provide essential coverage versus Ground, Rock, and Steel types. A fast Glare is useful to neuter a threat before it gets out of control - Seviper doesn't really need more coverage considering the utility of a 100% paralysis move. Alternatively, even though Crest Seviper is fast and this set doesn't have Attack investment, having priority is always useful, so Sucker Punch is an option, in which case a Naive nature should be used instead of Timid. This set doesn't really mind being burned, so Infiltrator's ability to hit through Substitute and screens may prove more useful overall than Shed Skin.
Seviper @ Seviper Crest
Ability: Shed Skin / Infiltrator
EVs: 252 Atk / 4 Def / 252 Spe
Jolly Nature
- Poison Jab
- Bulldoze (replace with Earthquake once TM is available)
- Sucker Punch
- Swords DanceBulldoze is physical Seviper's best coverage move, hitting opposing Rock, Steel, and Poison types. Because this is a physical set, Shed Skin is a more appealing option because this set is crippled by being burned. Swords Dance is used over Coil because Seviper isn't used any inaccurate moves (it doesn't get Gunk Shot), and because Seviper is strong and frail, boosting its Attack higher is more valuable than boosting its Defense. Even though Sucker Punch is used, a Jolly nature is still preferred because Sucker Punch is not the main move Seviper will be using, and Seviper sits at a critical speed tier. And even though Seviper is fast, considering how many Pokemon can still be faster due to Choice Scarf or all of the terrains, Sucker Punch is preferred over Crunch, as priority is usually worth a small decrease in power.
Skuntank
SpoilerCrest Effect: When Skuntank is hit by a Ground attack, Skuntank's Attack is boosted by 1 stage, and Sunktank is immune to the move.
Rating: Skuntank is usually only weak to Ground, so now nothing can hit Crest Skuntank super-effectively and it gains a second immunity (adding to the Psychic immunity it already had). However, this is not nearly as overpowered as you might think. Having no weaknesses, 4 resistances, and 2 immunities sounds incredible, but Skuntank is still not all that strong (unless it gets the boost from being hit by a Ground move), not all that fast (though it does get STAB Sucker Punch), and its bulk is only decent, meaning it can still be overwhelmed by strong neutral attacks. The point is, while removing its only weakness is a really nice buff, Crest Skuntank is far from some unbeatable menace.
Skuntank @ Skuntank Crest
Ability: Aftermath
EVs: 4 HP / 252 Atk / 252 Spe
Adamant Nature
- Throat Chop
- Sucker Punch
- Poison Jab
- Play RoughPriority is extremely helpful, but Skuntank also needs a reliable option that will always do damage, hence having Throat Chop as well (Throat Chop is also stronger than Sucker Punch). Play Rough is good coverage against Dark and Fighting types that resist Skuntank's Dark moves. Toxic is another potential option to wear down bulkier foes. An Adamant nature is used as Sucker Punch is a priority move, and a Jolly nature isn't desperately needed. Stench only has a 10% chance of activating - Aftermath's 25% HP of damage is more useful on average.
Spiritomb
SpoilerCrest Effect: Spiritomb's attacks have their damage boosted by an amount equal to (30% multipled by the number of fainted allies). At the end of each turn, Spiritomb heals by an amount equal to (1/16 of Spiritomb's max HP multipled by the number of fainted foes).
Rating: This is unquestionably one of the most overpowered Crests, if not the best one. If all of Spiritomb's teammates have fainted, it gets a 150% boost to its attacks, which is the same boost that you would get by using Work Up 3 times. On top of that, if your opponent had 6 Pokemon to start and are down to their last one, Spritomb will heal 5/16 of its health at the end of every turn, which is 5 times as much recovery as Leftovers gives. Obviously, Spiritomb will often be receiving power boosts and healing that are less than these maximums, but as long as Spiritomb isn't out at the very beginning of the battle, it's receiving massive buffs. This Crest is ridiculous. However, Spiritomb is still kind of walled by opposing Dark types.
Spiritomb @ Spiritomb Crest
Ability: Infiltrator
EVs: 252 HP / 252 Atk / 4 Def
Brave Nature
- Sucker Punch
- Will-o-Wisp
- Taunt
- PsychicEven though Spiritomb will have boosts in power, Will-o-Wisp is still useful for residual damage and to cripple physical attackers, which will make Spiritomb really hard to take down given the recovery it'll be getting. Taunt shuts down opposing setup and also will force Sucker Punch to work (unless they switch). Psychic provides coverage against Fighting types primarily, and will do good damage even without Special Attack investment if enough of Spiritomb's allies have fainted. Infiltrator's bypassing of Substitute, Screens, and Safeguard is useful, as even with the recovery from the crest, you're probably not going to be PP stalling that much. However, PP stalling can definitely work with enough potions.
Spiritomb @ Spiritomb Crest
Ability: Infiltrator
EVs: 252 HP / 4 Def / 252 SpA
Quiet Nature
- Dark Pulse
- Psychic
- Hidden Power Fighting / Hidden Power Bug / Will-o-Wisp / Shadow Ball- Sucker Punch
Alternatively, Spiritomb can go a more specially-based route. This makes Sucker Punch weaker but increases the power of its more spammable, reliable attacks. However, I would probably say that the physical set is slightly better than this one due to how important of a move Sucker Punch is. If you manage to get a Hidden Power that's super-effective against Dark types, then that's great. Otherwise, Shadow Ball is pretty redundant considering Dark Pulse and Psychic, but does hit Fairy types harder. Being able to burn opponents is probably more useful overall.
Stantler
SpoilerCrest Effect: Increases Stantler's Attack stat and Accuracy by 50%.
Rating: Stantler now effectively has 433 Attack, which is approximately the same amount that Kyurem-Black has, so it'll be hitting fairly hard. Like Hypno, the main use of the accuracy buff is to make Hypnosis fairly reliable at 90% accuracy. Stantler doesn't have access to two of its better moves, Double-Edge and Earthquake right now, but it can still make do. It's not terribly fast and pretty frail, even considering intimidate, so Crest Stantler still won't do well against faster offensive threats, but it can now put in a good work against everything else.
Stantler @ Stantler Crest
Ability: Intimidate
EVs: 252 Atk / 4 Def / 252 Spe
Jolly Nature
- Return
- Jump Kick
- Sucker Punch
- HypnosisThese are the best moves it gets. Intimidate is more useful overall than Sap Sipper due to being way less circumstantial. A Jolly nature is critical so Stantler can outspeed as much as it can and put them to sleep. Even with a Jolly nature, Stantler isn't terribly fast, which is why Sucker Punch is used over Throat Chop for coverage against Ghost types.
Torterra
SpoilerCrest Effect: Swaps Torterra's weaknesses and resistances. Crest Torterra is weak to Rock and Ground, but resists Fire, Flying, Bug, and has a 4x resistance to Ice. It is still immune to Electric.
Rating: Overall this is beneficial for Torterra. Rock and Ground are fairly common coverage options whch is unfortunate, but despite Torterra's poor speed, it can still outspeed a decent chunk of Rock and Ground types and threaten them with its STAB attacks. Also, the 4 resistances that Crest Torterra picks up are all weak to Rock, meaning that by having a Rock move, Torterra can been seen as an answer to those types of Pokemon, as it resists their attack and can hit them all back super-effectively. However, none of Torterra's stats are boosted, so this is not the biggest buff, but it's interesting and usable.
Torterra @ Torterra Crest
Ability: Overgrow
EVs: 252 Atk / 4 Def / 252 Spe
Adamant Nature
- Wood Hammer
- Earthquake
- Rock Slide
- Rock Tomb / Curse (replace with Rock Polish once TM is available)Speed investment is used to ensure Torterra will outspeed most defensive Pokemon and slower offensive Pokemon up to and including base 55s. Although Wood Hammer has recoil, it's 50% stronger than the next best option in Seed Bomb. Torterra gets neither Rock Polish nor Swords Dance in this version. Rock Tomb might seem redundant with Rock Slide, but due to Torterra's Speed tier it will be in situations where it will be slower than its opponent, but faster after a Rock Tomb, meaning that you get free damage off. Curse is another option, in which case you'd want to switch the ability to Shell Armor, move the Speed EVs into HP, and probably move the Attack EVs into Special Defense to give Torterra good all-around bulk and ease in setting up.
Typhlosion
SpoilerCrest Effect: When Typhlosion uses a physical attack, its Special Attack stat is used in the damage calculation. Typhlosion's contact moves deal an additional second hit that has 20% of the power of the first hit.
Rating: Crest Typhlosion has a lower maximum damage output compared to other items such as Choice Specs, Life Orb, or even Charcoal, but the Crest makes it so Typhlosion's weaker attacks will do much more damage. This Typhlosion's coverage moves have higher consistent damage because previous unviable physical options now do greatly increased damage with the 20% extra second hit and coming off of Typhlosion's higher Special Attack stat.
Typhlosion @ Typhlosion Crest
Ability: Blaze
EVs: 252 SpA / 4 SpD / 252 Spe
Timid Nature
- Eruption
- Flare Blitz
- Slash and Burn- Stomping Tantrum (replace with Earthquake once TM is available)
Eruption is still Typhlosion's strongest move and doesn't have the recoil issues that Flare Blitz does. Flare Blitz is effectively 144 power given the secondary hit and has a 19% chance to burn. The recoil is well worth the massive increase in power due to Typhlosion being a glass cannon. It's necessary because Eruption is circumstantial; Flare Blitz is reliable damage. Slash and Burn is the best coverage move, hitting Rock and Water types, and has effectively 108 power with a 19% chance to burn. As we don't have access to the Earthquake TM yet, Stomping Tantrum is the best option in the final slot to hit opposing Fire-types which resist the first 3 moves. Nature Power is another option as it is typically very potent in Rejuvenation, but its coverage is inconsistent.
Whiscash
SpoilerCrest Effect: When Whiscash is hit by a Grass attack, Whiscash's Attack is boosted by 1 stage, and Whiscash is immune to the move.
Rating: In a similar vein to Skuntank, this Crest is a nice buff, taking Whiscash's only weakness and turns it into an immunity, so Crest Whiscash has 4 resistances, 2 immunities, and no weaknesses. Whiscash has decent bulk and little immediate offensive presence, but it does have access to Dragon Dance. The Crest makes it easier to set up and also allows Whiscash to beat or even set up on most Grass types, which it would usually get walled and OHKOd by. However, without a boost, Whiscash is very weak, and is still not incredibly strong or fast after one Dragon Dance.
Whiscash @ Whiscash Crest
Ability: Oblivious
EVs: 4 HP / 252 Atk / 252 Spe
Jolly Nature
- Dragon Dance
- Earthquake
- Waterfall
- Rock SlideDragon Dance is what makes Whiscash capable of denting opposing teams. Aqua Tail and Stone Edge are more powerful, but less accurate options, and neither have the chance to flinch as opposed to its other moves. Whiscash is not frail, but it's not so bulky that it can reliably set up multiple Dragon Dances. This, combined with Whiscash's poor Speed, is why a Jolly nature is used. Oblivious is very niche and circumstantial, but for in-game it's better than Hydration because you can use items to heal status conditions, but you can't do that with Taunt or Infatuation that Oblivious protects from.
Zangoose
SpoilerCrest Effect: This Crest poisons Zangoose. If Zangoose is poisoned, rather than taking damage from the poison, Zangoose will restore HP instead.
Rating: This is exactly the same as the set that Zangoose usually runs, except that Zangoose gradually recovers health rather than being chipped down. Zangoose is very frail and still can't survive strong neutral hits, but this helps get Zangoose out of the range of opposing priority or weaker attacks, rather than the poison putting Zangoose in the range of those attacks. It obviously is a straight buff, but it doesn't boost Zangoose's Attack or Speed, so this isn't as massive of a buff.
Zangoose @ Zangoose Crest
Ability: Toxic Boost
EVs: 252 Atk / 4 Def / 252 Spe
Adamant / Jolly Nature
- Facade
- Knock Off
- Close Combat / Swords Dance
- Quick AttackAgain, Zangoose functions pretty much exactly the same as usual and will run the same set. Swords Dance allows Zangoose to potentially sweep with Quick Attack and break past bulky Pokemon, but you lose the extremely strong and useful coverage of Close Combat. Zangoose does get Belly Drum, but due to Zangoose's frailty, you're going to have a hard time finding opponents that you can set up on.
-
14

Rejuvenation 100% Walkthrough Discussion Thread and Link (Updated to V13!)
in Guides & Resources
Posted
AP:
"You’ve probably noticed a"
First off, as a suggestion, I think the Exp. All in V13 is a horrible investment. The Audino trainers are faster than ever due to candies, and they're available right from the start unlike V12. EV training is also faster because you're given the respective Power items in the rooms. Sure, the Exp. All does save a small amount of time, but due to all of the fantastic features I mentioned along with the steep price of 30 AP, it's not worth purchasing in my opinion, especially because you don't get much AP for achievements early on. I'd rather buy the rest of the EV cards/golden items I need, and then mints.
Anyway, I'm not sure if you want to mention this anywhere, but I believe there are 380 total AP in this game. How it works is: you get 1 AP per achievement, then after you do any 5 achievements, you begin getting 2 AP per achievement. Then after another 5 achievements, you get 3 AP per. And so on. So it doesn't matter which achievements you do, you will get the following amount of AP when you complete achievements: 1, 1, 1, 1, 1, 2, 2, 2, 2, 2, 3, 3, 3, 3, 3, etc.
There are 55 total achivements. So there should be 330 (sum of numbers 1 through 11, times 5) AP from doing achievements. And you get 50 from the virtual league (25 from beating the 8th gym and 25 from beating the champ), making 380.
It costs 235 AP to buy all of the golden items (excluding the Jetpack because we can't use Waterfall yet) and all 6 EV training cards. But again, the rate of AP gain grows "exponentially" as you progress through the game due to the virtual league being later game and the mechanics of AP gain from achievements I mentioned.
Signature moves:
I think we should mention what each gym's signature move does because they're made up, so first time players will not know about them or what they do. For example, the guide mentions that some of Venam's Pokemon have Venam's Kiss, but it doesn't say what the move does. These can be put immediately under the Pokemon list for each Gym.